
Rampage Documentation
What is Rampage?
Rampage is a color ramp preset manager for Blender. It lets you save any Color Ramp you have built as a named preset, and bring it back later in any project with a single click. What Blender does not offer out of the box is a way to keep a ramp you liked: close the file and it is gone. Rampage turns your ramps into a reusable library.
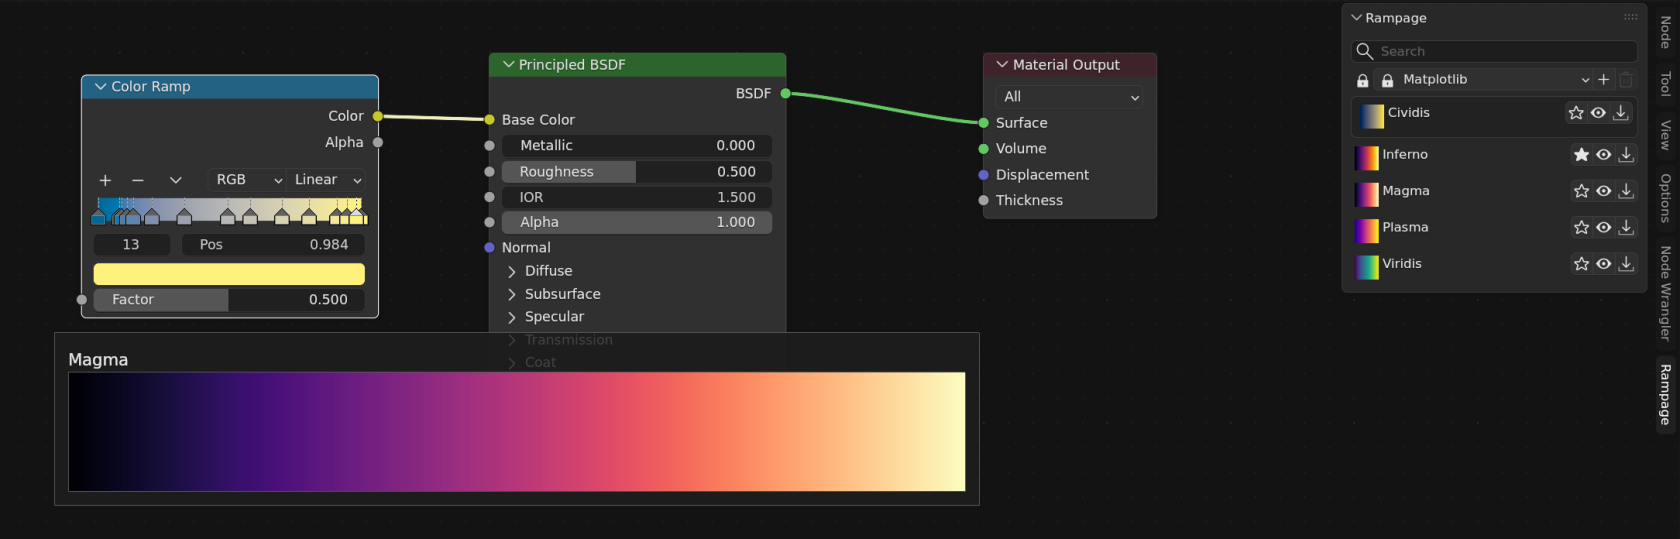
Beyond your own presets, Rampage ships with 449505 ready-to-use gradients in 1417 collections, from scientific colormaps designed for accurate data visualisation to hundreds of aesthetic gradients for design work.work, plus utility ramps for driving values in geometry nodes.. They are available the moment you install the add-on, with no setup.
Presets are stored as plain JSON files in Blender's configuration folder, not inside your .blend. This means a preset saved while working on one project is immediately available in every other project, and your library survives any individual file.
Rampage works in both the Shader Editor and the Geometry Nodes editor, on the same Color Ramp node you already use.
Requirements
Rampage is officially supported on official Blender releases only, currently from Blender 4.2 up to Blender 5.2. These are the versions Rampage is tested against.
Rampage has no external dependencies. It is pure Python using Blender's own API, so there is a single ZIP file that works on Windows, Linux and macOS alike, and installation never has to download or compile anything.
Rampage is not officially supported on unofficial Blender forks, because as a solo developer it is not realistic to test against every variant in existence. This includes, but is not limited to, forks such as Bforartists, K-Cycles, E-Cycles or Goo Engine.
Note: Being unsupported does not necessarily mean it will not work. Many forks only add features on top of a standard Blender base and leave the rest of the application untouched. Since Rampage carries no binary dependencies, it is likely to work on most forks. However, this cannot be guaranteed, since these forks cannot be tested. Use at your own risk.
Installation
The installation process is the same across all operating systems, and there is a single ZIP file for all of them.
- Download the add-on ZIP file from your order page.
- Open Blender and navigate to Edit › Preferences › Add-ons or Get Extensions (It's the same dialog).
- Click the Install button in the top-right corner.
- Select the downloaded ZIP file and click Install Add-on.
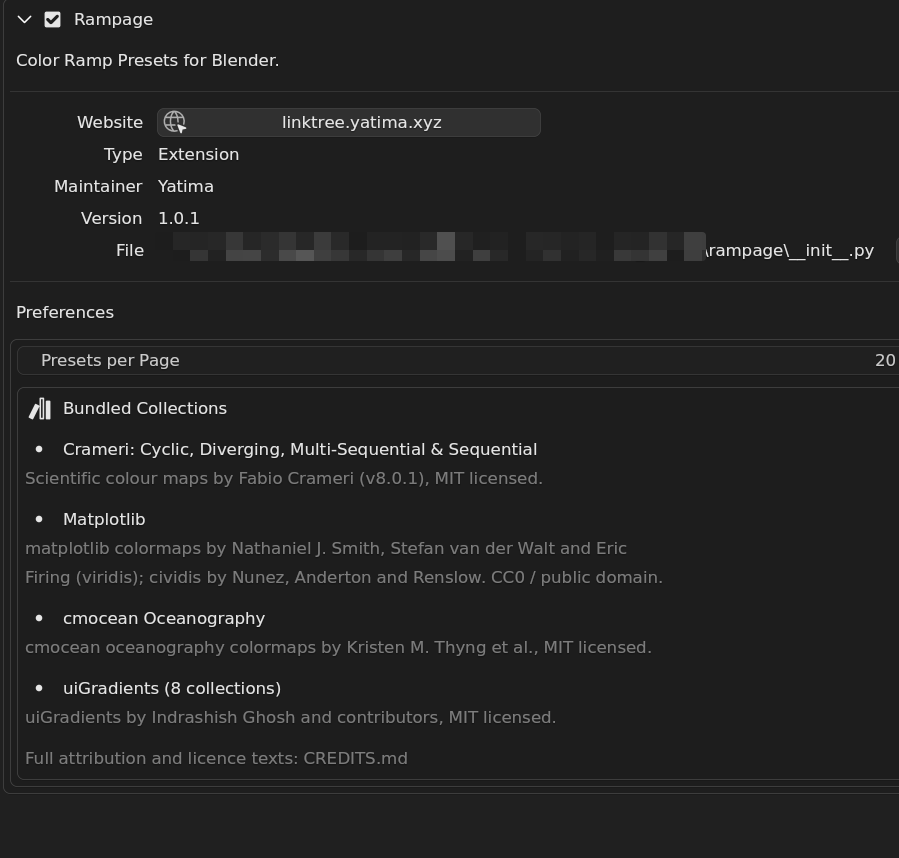
- Enable the add-on by checking the box next to "Rampage".
- The add-on panel will appear in the Shader Editor and the Geometry Nodes Editor sidebars (press N) under the "Rampage" tab.
Quick Start
This guide will get you using Rampage in under a minute. We will apply a bundled gradient and then save one of your own.
- Open a Shader Editor and select any material.
- Press N to open the sidebar and go to the Rampage tab.
- Pick a collection from the dropdown, for example Matplotlib.
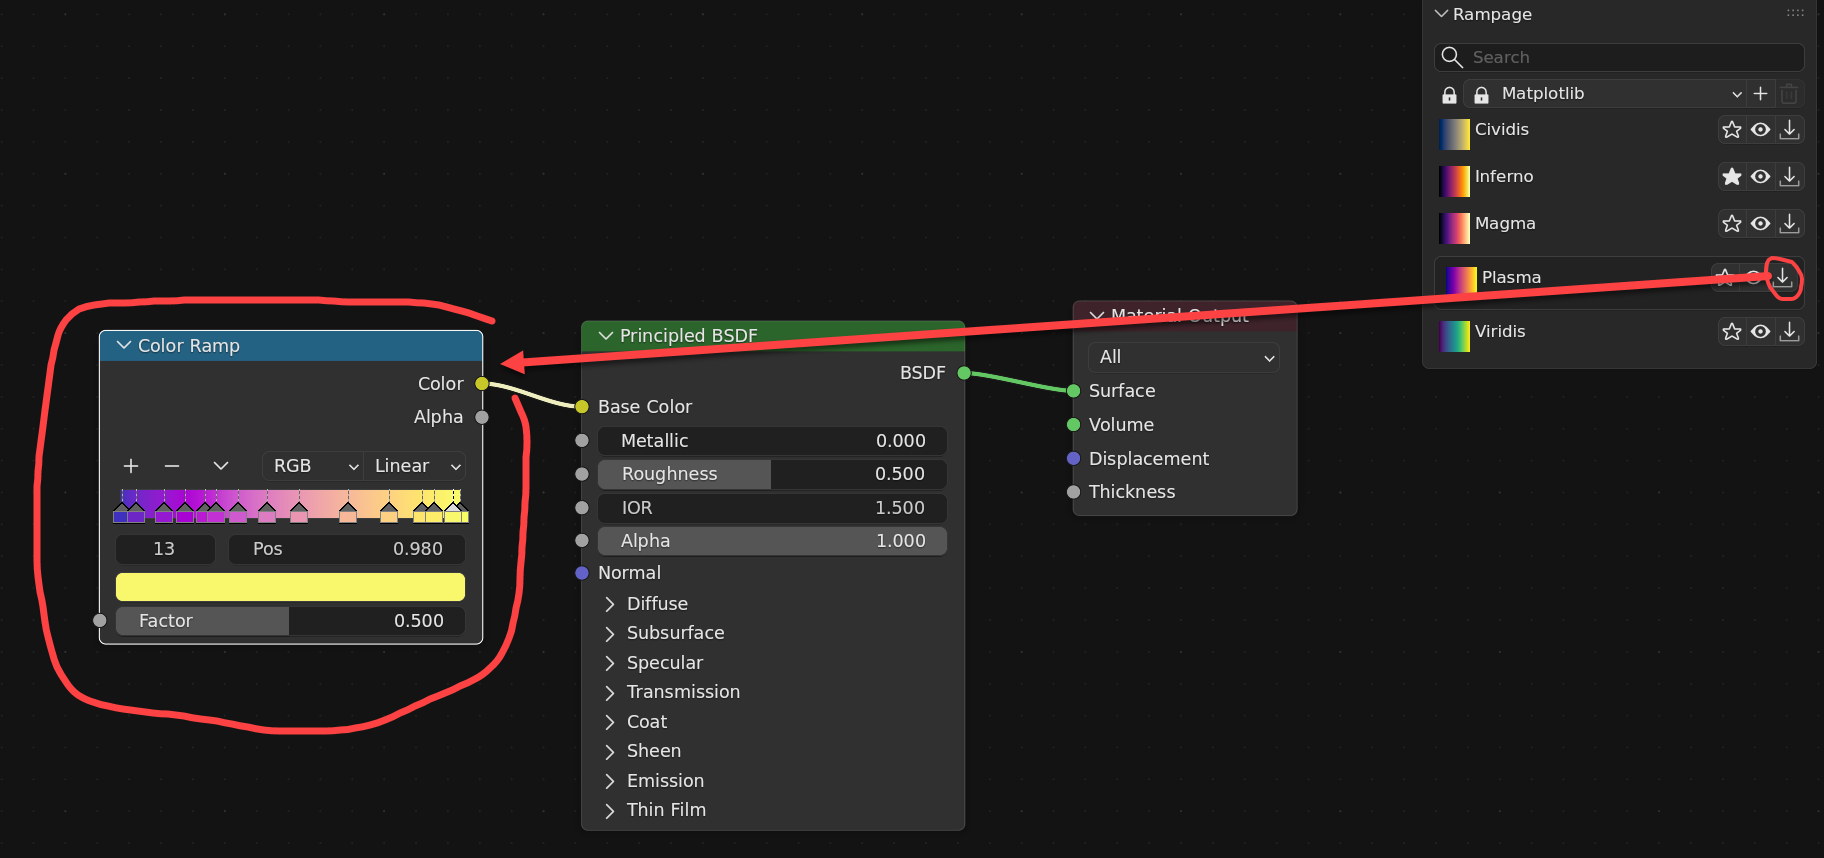
- Click the Apply icon on any preset row. If you have no Color Ramp selected, Rampage creates one for you, right in the middle of your view.
- Now edit that ramp by hand: move a stop, change a colour.
- Switch the collection dropdown to Custom, then click Save Ramp, give it a name and confirm.
Your ramp is now stored and will be there in every future project.
Interface Reference
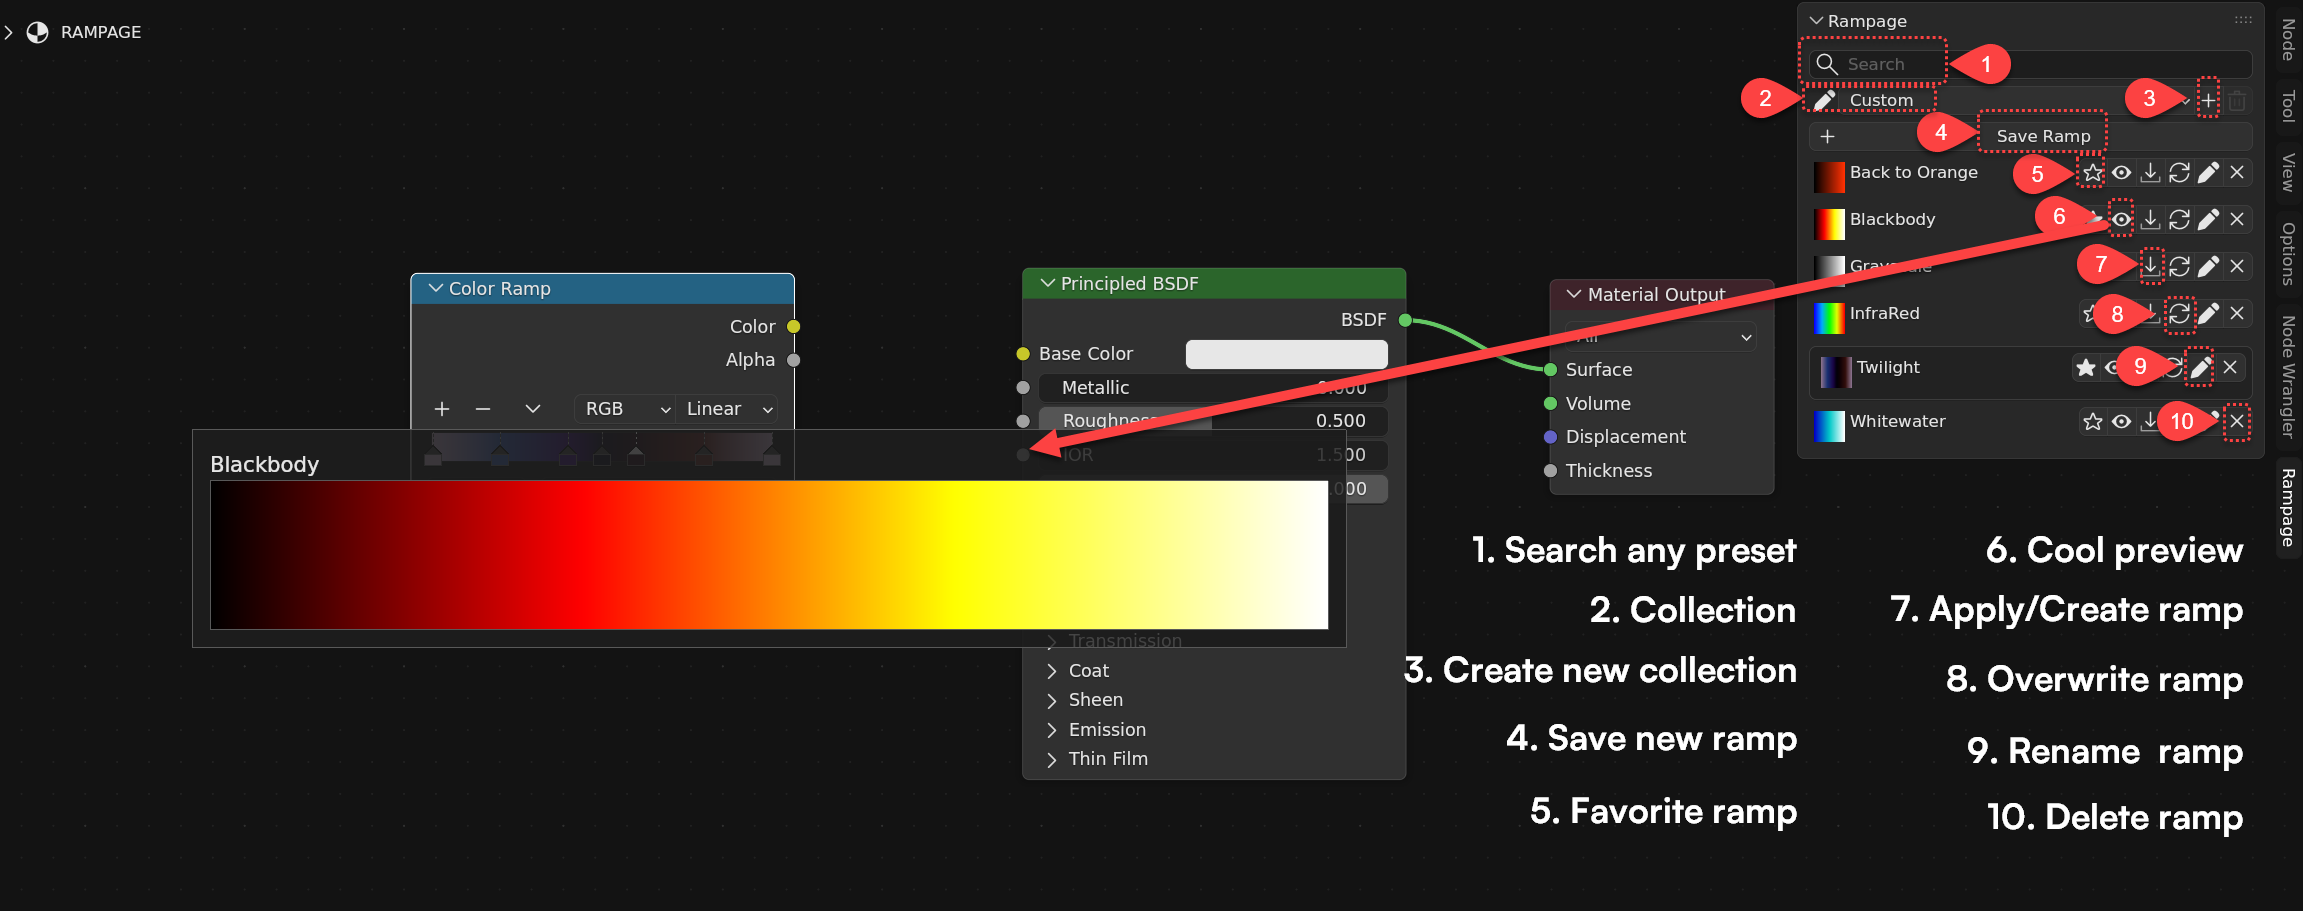
The Rampage panel lives in the sidebar (press N) of the Shader Editor and the Geometry Nodes editor, under the "Rampage" tab. This section explains each control.
The Active Color Ramp
Everything Rampage does revolves around the active Color Ramp: the node it reads from when saving, and the node it writes to when applying.
Rampage considers a Color Ramp active when it is selected in the node editor. If exactly one Color Ramp node is selected, that is the target. If several are selected, Rampage uses the first one.
The panel tells you the current state: with no ramp selected it shows "Apply creates a new Color Ramp node", and the Save Ramp button is greyed out because there is nothing to capture.
Collections
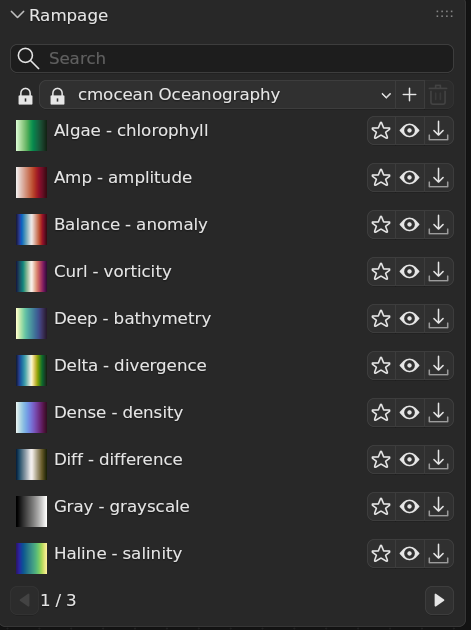
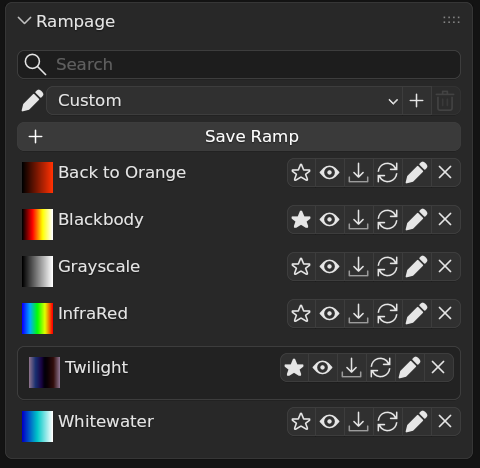
A collection is a named group of presets. The dropdown at the top of the panel selects which one you are browsing.
Collections come in two kinds, and the icon beside the dropdown tells you which you are in:
- Pencil icon = your collections. Fully editable. You can save, overwrite, rename and delete presets here.
- Lock icon = factory collections. Read-only. These ship with the add-on and cannot be modified, so an update can improve them without conflicting with your own work. You can still apply, preview and favourite anything in them.
The dropdown is split into two labelled sections:
- Factory lists the
1417 bundled collections (you can read but now write in there) - User holds Favorites, the default Custom collection, and any collection you create.
Creating a collection
Deleting a collection
Click the trash button. You will be asked to confirm, and told how many presets will be lost.
Warning: Deleting a collection removes every preset in it permanently. If any of those presets were favourited, those favourites are removed too, since they can no longer point at anything.
Preset Actions
Each preset is one row: a gradient chip, its name, and a set of action icons.
- Apply: writes the preset onto the selected Color Ramp. With none selected, it creates a new Color Ramp node instead.
- Preview (eye icon): opens a large preview of the gradient. See Preview Overlay below.
- Favorite (star icon): adds or removes the preset from Favorites. A filled star means it is favourited.
- Overwrite: replaces the preset's gradient with your currently selected ramp, keeping its name.
- Rename: changes the preset's display name.
- Delete: removes the preset, after confirmation.
The last three only appear in your own collections. In factory collections they are hidden entirely, so the row stays uncluttered rather than showing buttons that could never work.
When your selected Color Ramp matches a preset exactly, that preset's row is framed in a box. This is calculated live, not remembered. If you edit one stop by hand, the frame disappears on its own.
Applying Presets
Click the Apply icon on any preset row. The selected Color Ramp takes on the preset's colours, stop positions and interpolation mode.
If nothing is selected, Apply creates a new Color Ramp node for you, centered in your current view, already carrying the preset. The new node is left unconnected: guessing which socket you wanted would be wrong often enough to be a nuisance, so you cable it yourself.
Note: The new node is created selected and active, so applying a second preset right away replaces the gradient on that same node rather than creating another one. If you want a second node, click on empty space to deselect first.
Applying is a normal Blender action: Ctrl+Z undoes it, including removing a node that Apply created.
Saving Your Own Presets
With a Color Ramp selected, click Save Ramp. A dialog asks for a name, pre-filled with the node's label or name, and the preset is stored in the active collection.
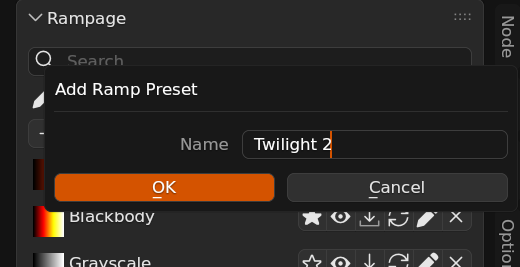
Names can contain spaces, accents and any Unicode character. If two presets (or more) have the same name, all of them are kept (your fault, not mine). Rampage never silently overwrites one preset with another.
Note: A name must contain at least one letter or digit. A name made only of symbols (for example "---") is rejected with a message, because Rampage derives an internal identifier from it.
Favorites
Favorites gathers presets you have starred from across every collection into a single list. It sits at the top of the User section in the dropdown.
Click the star on any preset to add it. Click it again to remove it. Favorites work on factory presets too.
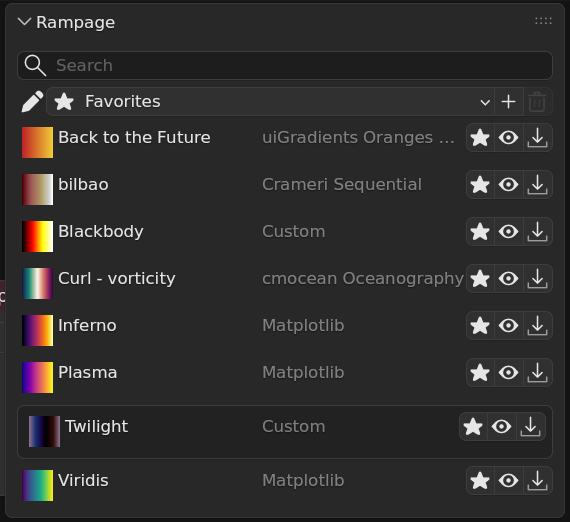
Each row shows which collection the preset came from, since the same name can exist in several collections. Rows are sorted alphabetically.
Favorites stores references, not copies. Starring a factory gradient does not duplicate it, so if a future update improves that gradient, your favourite reflects the improvement instead of being frozen at an old version.
Because Favorites mixes collections you are not currently looking at, its rows only offer read-only actions: apply, preview and unstar. Renaming or overwriting from here would silently edit a collection you cannot see.
If a favourited preset is deleted, the reference has nothing left to point at. Rampage shows that entry dimmed with an error icon, using the name it remembers and only the remove button stays active. This is deliberate. Silently dropping the entry would lose your data without telling you, and the preset might be missing for a temporary reason. You decide when to clear it.
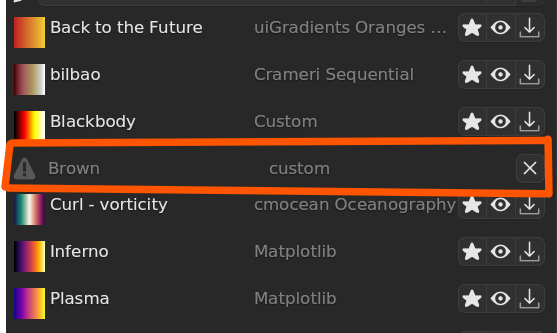
Note: Renaming a favourited preset does not break it. Rampage follows the rename, so a broken entry always means something changed outside your control, never that you used a feature.
Preview Overlay
Clicking the eye icon on any preset opens a large and very cool preview of that gradient, drawn over the node editor. This lets you inspect a gradient closely before committing to it.
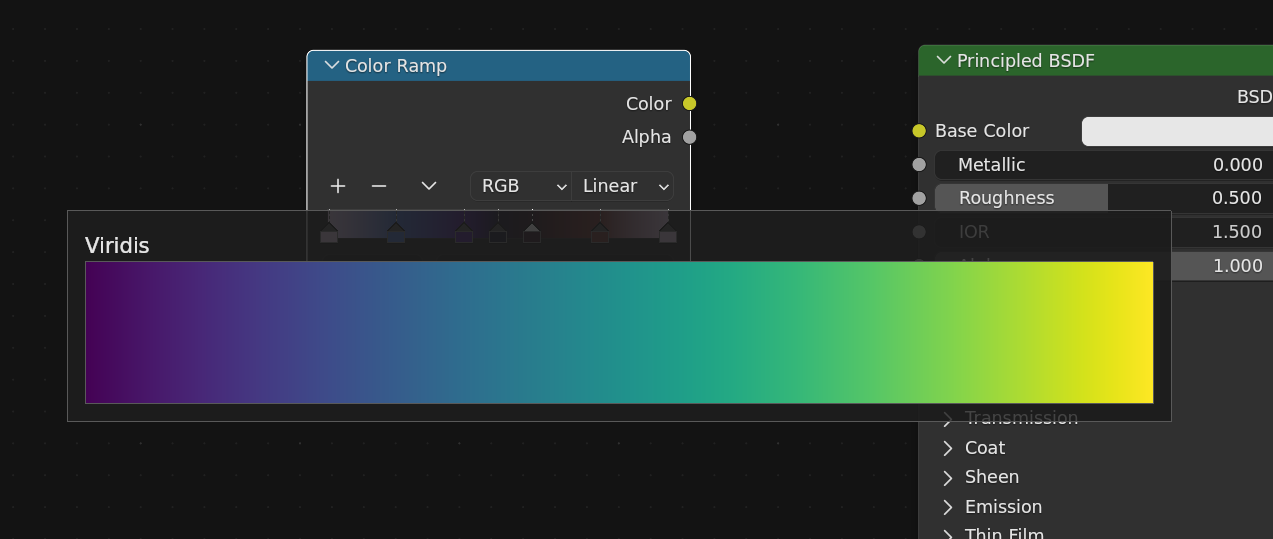
The preview closes when you press Esc, right-click, or click anywhere outside it. Clicking on the preview itself does nothing, so dismissing it is always deliberate.
The overlay sizes itself to your editor and centres itself in the area your sidebar does not cover, so it never hides behind the panel. Gradients with transparency are drawn over a checkerboard, exactly like Blender's own colour widgets.
While the preview is open you can still navigate the view: panning and zooming keep working.
Note: With two node editors open, the preview appears only in the one you opened it from. If they are on different monitors, clicking in the other editor will not close it, which lets you keep a gradient on screen while you work elsewhere.
Search
The search field at the top of the panel filters presets across every collection at once, including factory ones and your own.
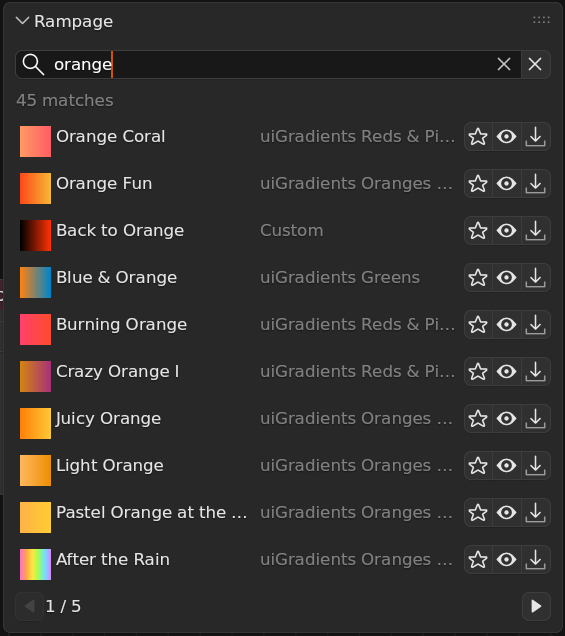
While a search is active it replaces the collection browser entirely. Click the X to clear it and return to browsing.
Search matches preset names and ignores case and accents, so deep finds Deep and crameri finds the Crameri maps. Each result shows its origin collection.
Like Favorites, search results offer only apply, preview and favourite. Editing a preset requires opening its collection first.
Pagination
Collections can hold hundreds of presets, so the list is paginated rather than growing an endless scrollbar. The controls appear at the bottom of the list whenever there is more than one page.
The arrows are disabled at the first and last page instead of wrapping around, matching how paging works elsewhere in Blender.
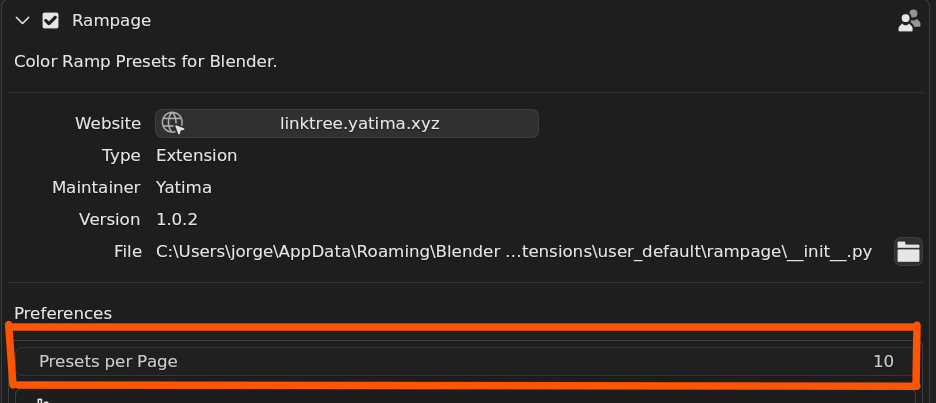
You can change how many presets fit on a page in Edit › Preferences › Add-ons › Rampage with the Presets per Page setting. Pick what suits your screen resolution and interface scale.
Bundled Collections
Rampage ships with 449505 gradients across 1417 read-only collections. They fall into twothree very different groups, and knowing which is which will save you time.
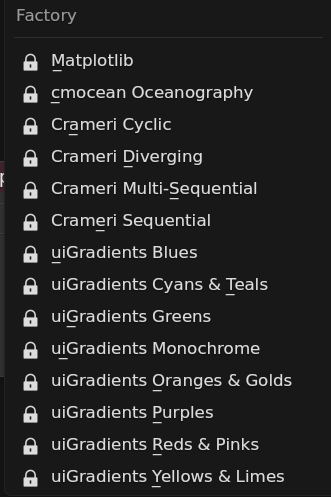
Scientific colormaps
These are designed for accurate data visualisation. They are perceptually uniform, meaning equal steps in your data look like equal steps in colour, and most remain readable with colour-vision deficiencies.
- Matplotlib (5): Viridis, Magma, Inferno, Plasma and Cividis. The modern standard for scientific plotting.
- Crameri (40, in four collections): split by kind into Sequential, Diverging, Cyclic and Multi-Sequential, which is how you actually choose one.
- cmocean Oceanography (22): these carry domain meaning.
deepreads as bathymetry,iceas sea ice,thermalas temperature. Their names keep that meaning, because it is the reason to pick one over a generic gradient.
Use these when the gradient is carrying information: heatmaps, data-driven shading, scientific rendering.
Design gradients
- uiGradients (382, in eight collections by dominant hue): aesthetic gradients chosen to look good rather than to encode data faithfully.
They are grouped by colour (Blues, Reds & Pinks, Greens, Purples, Cyans & Teals, Oranges & Golds, Yellows & Limes, Monochrome) because "something blue" is how these get picked. Their original names (Omolon, Farhan, Ibtesam) say nothing about colour.
Utility Ramps
They are transfer functions: ramps you place between a procedural texture and whatever consumes its value, most often in Geometry Nodes. The classic shape is Noise Texture → Color Ramp → Set Position, where the ramp decides how the geometry actually moves.
They are greyscale on purpose. What reaches a Set Position or a mix factor is a number, not a colour, so hue would carry no information and only make the ramp harder to read.
Why the smooth ones matter? A linear ramp changes direction abruptly at every stop. When that value drives geometry, the abrupt change becomes a visible crease in the surface at exactly that value. A fold contributed by the ramp, not by your texture. It stays invisible on a gentle input like a wave, and becomes obvious with a sharp one such as a Voronoi, or when the displacement is
large. The Smooth Ramp presets in Utility Falloff ease into and out of each stop instead, so the surface stays clean.
Every utility preset carries searchable tags: displacement, mask, threshold, range, falloff . Typing what you are trying to do finds them
even if you do not remember the preset's name.
Use these when the ramp is driving a value: displacement, masks, scattering density, mix factors. They work in the Shader Editor too, wherever a ramp feeds a single value rather than a colour.
About accuracy
The uiGradients and the utility ramps are exact: they were defined as a handful of hand-picked stops, so what you get is exactly what the original defines.
The scientific colormaps are close approximations. Each source defines its colormaps with 256 samples, while a Blender Color Ramp holds at most 32 stops, so some conversion is unavoidable. Each gradient uses the fewest stops that keep the worst-case deviation below the threshold of visibility, with stops concentrated where the gradient turns rather than spread evenly.
Warning: For visual work the difference is not perceptible. If you need the exact published values for scientific work, use the original data sources listed in Credits.
Troubleshooting
The Rampage panel does not appear
Rampage only shows in the Shader Editor and the Geometry Nodes editor. It does not appear in the Compositor or the Texture node editor. Make sure the sidebar is open with N and look for the "Rampage" tab.
The Apply button is greyed out
Apply needs somewhere to write. It is disabled when the node tree cannot be edited, which typically means you are looking at a linked material from another .blend file. Linked data cannot be modified.
Save Ramp is missing or greyed out
Save Ramp does not appear at all in factory collections, since they are read-only. Switch to Custom or one of your own collections.
If it appears but is greyed out, no Color Ramp is selected. Select one in the node graph.
Apply replaced my node instead of creating a new one
This is intended. After Apply creates a node, that node stays selected, so a second Apply targets it. Click on empty space to deselect before applying again if you want a separate node.
A favorite shows an error icon
The preset it pointed at no longer exists. It was deleted or its collection was removed. Click the X on that row to clear it. See Broken favorites above.
My presets disappeared
Presets live in Blender's configuration folder, which is tied to the Blender version. Installing a new major version of Blender starts with a fresh configuration folder. Blender can copy your previous settings over on first launch; if you skipped that, your presets are still in the older version's config folder.
Something looks wrong in the panel
Rampage is built to never break Blender's interface: a damaged preset file degrades to a message rather than an error. If you see "Rampage: draw error", a preset file may have been edited by hand or corrupted. Open the System Console (Window › Toggle System Console on Windows) for details.
Roadmap
Features under consideration for future versions. Nothing here is a commitment to a date.
- Compositor and Texture node editor support. These use different node types than the Shader and Geometry Nodes editors, so they need their own handling.
- Importing collections from disk. Sharing a collection with someone else currently means copying JSON files by hand.
- Exporting collections. The other half of the above.
- Reordering presets manually, instead of only alphabetically.
Tagson presets, for filtering beyond names.
Changelog
Version 1.1.0 (2026/09/06)
Added: Utility Range. 24 greyscale ramps that limit, lift or compress how far a value travels, for softening a displacement without touching the texture.
Added: Utility Threshold. 21 greyscale ramps that isolate part of a value range, for masks and cutoffs with hard, medium or soft edges.
Added: Utility Falloff. 11 greyscale ramps that reshape a transition, including smooth eased ramps that avoid the visible crease a linear ramp leaves in displaced geometry, and stepped ramps for quantising into terraces.
Version 1.0.2 (2026/07/21)
First public release :-)
-
Fixed: The node editor no longer slows down while browsing a collection of your own presets.
- Fixed: Applying a preset from Favorites or search no longer stops working when your own collection is empty.
- Added: Favorites, star presets from any collection and find them in one place.
- Added: Bundled collections are marked read-only so you cannot overwrite them by accident.
- Fixed: Deselecting a Color Ramp no longer leaves it as the target, which could overwrite it unintentionally.
- Fixed: New Color Ramp nodes are created centered in the view instead of under the sidebar.
- Added: Applying a preset with no ramp selected creates a new Color Ramp node for you.
- Added: Large preview overlay to inspect a gradient in detail without applying it.
- Fixed: Applying a preset from search results no longer fails when it lives in another collection.
- Added: Presets are listed alphabetically, and long collections are paginated.
- Added: 382 uiGradients design gradients, grouped by dominant colour.
- Added: cmocean oceanography colormaps, named by what they represent.
- Added: Crameri scientific colour maps, split into sequential, diverging, cyclic and multi.
- Added: Matplotlib colormaps (Viridis, Magma, Inferno, Plasma, Cividis).
- Added: Page size configurable in the addon preferences.
- Added: Search presets by name across every collection at once.
- Added: The preset matching your current ramp is highlighted in the list.
- Added: Organise your presets into your own collections.
- Fixed: The panel no longer breaks if a preset file is damaged or edited by hand.
- Added: Gradient preview chip on every preset, so you can see it before applying it.
- Added: Overwrite, rename and delete your saved presets.
- Fixed: The panel now also appears in the Geometry Nodes editor.
- Added: Sidebar panel in the Shader Editor and the Geometry Nodes editor.
- Added: Save any Color Ramp as a named preset and apply it back with one click.
- Added: Detection of the Color Ramp you are working on, in both node editors.
- Added: Active-Ramp resolution and add/replace/remove/apply operators.
- Added: Core model, multi-library storage and registration skeleton.
Credits
Rampage was developed by Yatima.
Licensing
Rampage is licensed under GPL-3.0-or-later. Blender add-ons run inside Blender and use its Python API, so the Blender Foundation's position is that they are derivative works and must be GPL-compatible.
The bundled gradient collections are not relicensed by this. Each keeps the license it was published under, and those terms are what govern them if you extract them and use them elsewhere. MIT and CC0 are both permissive and GPL-compatible, which is what makes bundling them lawful: the combined work is distributed as GPL, while each component remains under its own terms.
Bundled Collections
Matplotlib colormaps
The modern standard for scientific plotting: Viridis, Magma, Inferno, Plasma and Cividis.
These colormaps are released into the public domain. Attribution is not legally required; it is given because the work deserves it.
Scientific colour maps (Crameri)
Forty perceptually uniform colour maps, readable with colour-vision deficiencies, grouped into sequential, diverging, cyclic and multi-sequential.
cmocean
Twenty-two oceanography colormaps that carry domain meaning in their names.
uiGradients
382 aesthetic design gradients, grouped by dominant hue.
The full license texts are included in the CREDITS.md file shipped inside the add-on.
The MIT License permits redistribution and use in source and binary forms, with or without modification, provided that copyright notices and license terms are retained.
Utility Ramps
56 greyscale transfer functions, in three collections.
Author: Yatima.License: GPL-3.0-or-later, as part of Rampage itself.
Unlike the other bundled collections, these are not third-party content: they are authored for Rampage and carry the add-on's own license. They are listed here for completeness, not because attribution is a license condition.
Contact and Support
If you encounter issues, have questions, or want to suggest features.
For technical support, bug reports, or feature requests:
support@yatima.xyz
When Reporting Bugs
Please include the following information to help diagnose issues quickly:
- Your Blender version.
- Your operating system.
- A description of what you were trying to do.
- What happened instead of the expected result.
- Any error messages from the System Console.