
Sound Reaktor Documentation
Installation
Installing the Add-on
The installation process is the same across all operating systems:
- Download the addon ZIP file corresponding to your operating system from your order page. There are four versions: Windows, Linux, macOS x64, and macOS arm64. Since they include dependencies specific to each operating system, you can only install the version for your system.
- Open Blender and navigate to Edit › Preferences › Add-ons.
- Click the Install button in the top-right corner.
- Select the downloaded ZIP file and click Install Add-on.
- Enable the add-on by checking the box next to "Sound Reaktor".
- The add-on panel will appear in the 3D Viewport sidebar (press N) under the "Sound Reaktor" tab.
Sound Reaktor relies on NumPy and SciPy for its audio analysis capabilities. NumPy handles the numerical computations, while SciPy provides the signal processing algorithms (FFT and onset detection) that make frequency analysis possible.To be able to open MP3, OGG, OPUS, FLAC, M4A, and AAC audio files, it uses the PyAV library. This is the reason why there is a version for each operating system and why the ZIP files are so large. Each of them includes those external libraries (SciPy and PyAV) compiled for each system. To ensure compatibility with Blender 5.1, there is a specific version of the libraries for the newest Blender release(s).
Starting with version 2.0 of Sound Reaktor, it is no longer necessary to install any dependencies. Sound Reaktor is now a Blender extension and therefore includes all required dependencies by default.If you have installed, or plan to install, version 2.0 or later of Sound Reaktor, you only need to install the correct build for your operating system. If for any reason you want to install an earlier version, the legacy installation method can be found at the end of this documentation.
Quick Start
This guide will get your first animation running in under a minute. We'll make a cube pulse to a kick drum:
- Create a cube (or use the default one). If you've deleted it, add a new one with Shift+A › Mesh › Cube.
- Select the cube and open the sidebar by pressing N in the 3D Viewport.
- Navigate to the Sound Reaktor tab in the sidebar.
- Load your audio file using the file picker. Sound Reaktor Pro supports WAV, MP3, OGG, FLAC, OPUS, M4A, and AAC files. Sound Reaktor Lite supports WAV and MP3 only.
- Leave the default settings. The add-on defaults to Kick preset (40-130 Hz), FFT analysis, and Scale animation.
- Click "MAKE IT DANCE!"
- Play the animation by pressing Spacebar.
Your cube should now be scaling up and down in sync with the kick drum. The animation keyframes have been automatically generated across the entire audio duration.
Viewing Analysis Progress
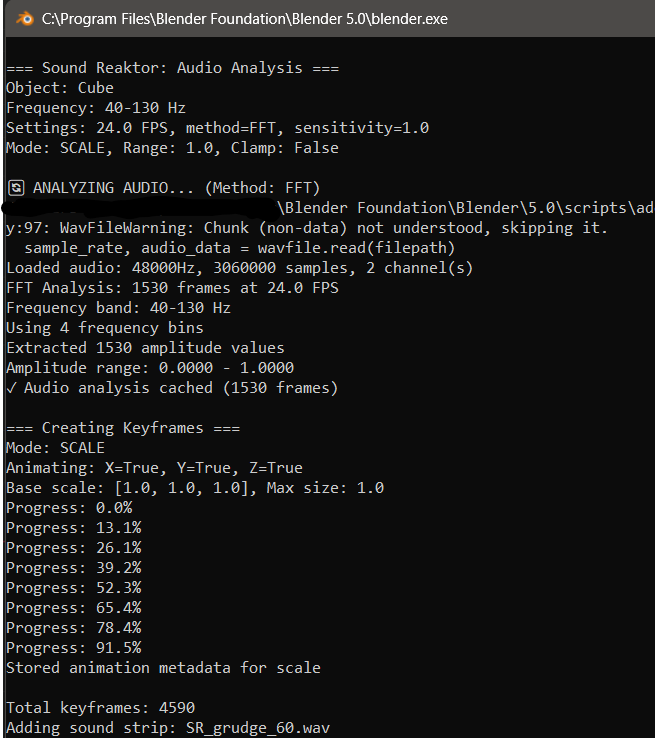
For longer audio files, you may want to monitor progress. Open Blender's System Console before clicking "MAKE IT DANCE!":
- Windows: Window › Toggle System Console.
- Linux/macOS: Launch Blender from a terminal to see console output.
The console displays detailed progress information including frames processed, frequency bands analyzed, and any warnings or errors.
Interface Reference
The Sound Reaktor panel is located in the 3D Viewport sidebar (press N) under the "Sound Reaktor" tab. This section explains each control in detail.
Audio File Settings
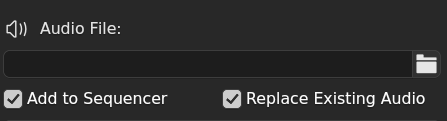
Audio File
Select the audio file to analyze. Sound Reaktor Pro supports WAV, MP3, OGG, FLAC, OPUS, M4A, and AAC files. Sound Reaktor Lite supports WAV and MP3 only.
Note: The optimal format for working with Sound Reaktor is WAV. While the other supported formats will work perfectly, it's important to keep in mind that some of them, such as MP3, are lossy compressed formats. The human ear may not notice a difference, but the data that Sound Reaktor uses for its processing will be degraded by this compression. In addition, decoding these audio formats adds some extra time to the analysis process.
Add to Sequencer
When enabled, Sound Reaktor automatically adds your audio file to Blender's Video Sequencer, allowing you to hear the audio during playback. The audio strip is named with an "SR_" prefix for identification.
Replace Existing Audio
When enabled (recommended), removes any previous audio strips added by Sound Reaktor (identified by "SR_" prefix) before adding the new one. Keeps your sequencer clean when experimenting with different audio files.
KEYFRAME MODE
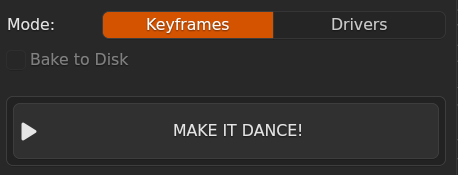
The default mode of Sound Reaktor is "Keyframe mode". In this mode, the addon analyzes the audio using the selected parameters and then creates keyframes on every frame throughout the animation, setting the timeline length according to the duration of the loaded audio file in the process. This mode is ideal for distributing the .blend file with the generated animations to users who do not have the addon, or for rendering on a render farm. The process is slower than in "Drivers" mode, which will be discussed next, although with update 2.4.2, keyframe creation is between 50 and 100 times faster than in previous versions.
- Loads your audio file and extracts raw sample data.
- Applies High/Low pass filters if they're enabled.
- Analyzes using your chosen method within your frequency range.
- Processes results according to your parameters.
- Creates keyframes on your selected object for every frame.
- Optionally adds audio to Video Sequencer.
Important: You don't need to clear anything before re-running. Sound Reaktor automatically replaces existing keyframes, so you can experiment freely by adjusting parameters and clicking again.
Driver Mode (Pro Only)
By default, Sound Reaktor bakes animation as keyframes, one keyframe per frame, permanently stored in the .blend file. Driver Mode is an alternative workflow: instead of generating keyframes, Sound Reaktor analyzes the audio into memory and applies Blender drivers that read that data in real time during playback.
The toggle between the two modes is located in the main panel, just below the audio file selector:
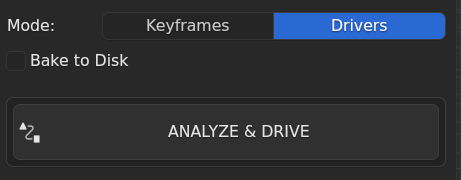
Switching to Drivers changes the main button label from MAKE IT DANCE! to ANALYZE & DRIVE.
When to use Driver Mode
| Use Keyframes when… | Use Drivers when… |
| You want the animation to work without Sound Reaktor installed | You want to tweak parameters and re-analyze without rebaking |
| You're delivering the .blend to someone else | You're using Spectral Bins (requires Drivers) |
| You need accumulative rotation | You want lighter .blend files (no stored keyframes) |
| You're rendering on a farm with no addon access | You want to combine multiple analyses in one GN graph |
Workflow
- Select an object and configure your analysis settings as usual.
- Switch the toggle to Drivers.
- Click ANALYZE & DRIVE. Sound Reaktor analyzes the audio and stores the result in RAM. Drivers are applied to the target property immediately.
- Press Space to play the animation. The object responds to the audio in real time.
If you want the analysis to persist after closing Blender, enable Bake to Disk (see below) before clicking ANALYZE & DRIVE.
Bake to Disk
Analysis data loaded into RAM is lost when Blender closes. Enable Bake to Disk to save the analysis to a .npz cache file on disk. The cache is stored in a subfolder next to your .blend file:
my_project/
├── my_scene.blend
└── blendcache_my_scene/
    └── SR_cache_[hash].npz
When you reopen the .blend, Sound Reaktor automatically reloads the cache. Drivers work immediately without re-analyzing.
Important: Bake to Disk requires the .blend file to be saved. If the file has not been saved yet, the option is disabled.
If analysis parameters change (audio file, frequency range, method, etc.), the existing cache is invalidated automatically and a new one is written on the next ANALYZE & DRIVE.
Driver Count Indicator
The panel displays the number of active Sound Reaktor drivers on the selected object. This is useful when combining multiple analyses on the same object. For example, a Spectral Bins node group plus a Custom Property driver.
Bake to Keyframes
Once drivers are applied, you can convert them to standard keyframes at any time using the Bake to Keyframes button. This processes all Sound Reaktor drivers on the active object at once and removes them after baking, leaving behind a regular keyframe animation that works without the addon.
Use this when:
- Sharing the file with collaborators who don't have Sound Reaktor installed.
- Sending to a render farm.
- You're done tweaking and want to finalize the animation.
Remove Drivers
The Remove Drivers button removes all Sound Reaktor drivers from the active object without converting them to keyframes. The analysis data in RAM (and on disk, if Bake to Disk was enabled) is preserved. You can re-apply drivers at any time with ANALYZE & DRIVE.
Limitations
- Accumulative Rotation is not supported in Driver Mode. The option is grayed out when Drivers is active. Use Keyframes mode if you need accumulative rotation.
- Spectral Bins is only available in Driver Mode and cannot be switched to Keyframes mode directly. To convert Spectral Bins to keyframes, first route individual bin outputs to properties via Custom mode, then use Bake to Keyframes.
- Analysis data stored in RAM only (Bake to Disk disabled) is lost when Blender closes. If you reopen the file without the cache, drivers will be present but inactive, re-run ANALYZE & DRIVE to restore them.
Analysis Preview
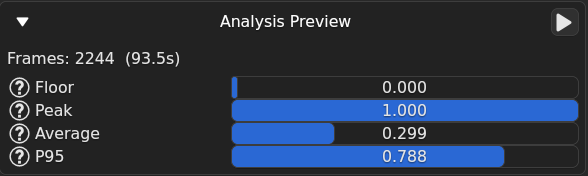
The Analysis Preview panel shows a quick statistical summary of the last baked analysis. It shows Floor (minimum), Peak (maximum), Average, and P95 (95th percentile) values across all frames. Use it to understand the dynamic range of your audio signal before animating.
The cost of Analysis Preview is zero. Sound Reaktor analyzes the audio to display the values, so when MAKE IT DANCE! is pressed, it will use the cached values from the audio analysis preview.
- Floor: Minimum amplitude across all frames. If Floor is too high, the object never returns to rest. Lower Sensitivity or enable Noise Filter to push it down.
- Peak: Maximum amplitude across all frames. If Peak is below 1.0, the animation will never reach full range. Increase Sensitivity to boost the peak.
- Average: Mean amplitude across all frames. A low Average with a high Peak means the audio is mostly quiet with occasional loud moments. Increase Sensitivity to raise it.
- P95: 95th percentile amplitude. 95% of frames are at or below this value. If P95 is close to Peak, the audio is consistently loud. If P95 is much lower than Peak, only occasional spikes reach the top.
Pre-Filter (Pro Only)

Before the audio reaches the analyzer, you can run it through a high-pass, a low-pass filter or both.
This is useful when your frequency range selection alone isn't enough to isolate what you're after: a high-pass removes low-end rumble that might skew the analysis upward, while a low-pass cuts the high-frequency content that can introduce noise into bass-focused animations.
Frequency Range
The frequency range determines which part of the audio spectrum Sound Reaktor listens to. Different instruments and sounds occupy different frequency ranges.
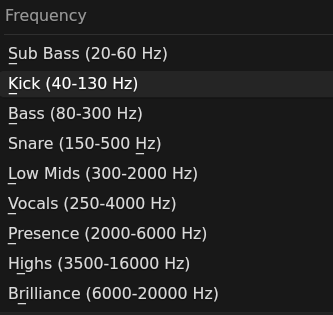
Preset Mode
Nine carefully tuned frequency ranges covering the most common use cases:
| Preset | Range | Best For |
|---|---|---|
| Sub Bass | 20-60 Hz | New on 2.0: Felt more than heard. |
| Kick | 40-130 Hz | Kick drums, deep bass hits, sub-bass. |
| Bass | 80-300 Hz | Bass guitars, synth bass, 808s, low-end warmth. |
| Snare | 150-500 Hz | Snare drums, toms, percussive mid-range. |
| Low Mids | 300-2000 Hz | New on 2.0: guitar body, piano. |
| Vocals | 250-4000 Hz | Human voice, melodies, lead instruments. |
| Presence | 2000-6000 Hz | New on 2.0: vocal clarity, instrument attack. |
| Highs | 3500-16000 Hz | Hi-hats, cymbals, high synths, vocal sibilance. |
| Brilliance | 6000-20000 Hz | New on 2.0: Air, shimmer, high frequency texture. |
Custom Mode (Pro Only)
For precise control, specify any range between 20 Hz and 20,000 Hz. Some useful custom ranges:
- Sub-bass (20-60 Hz): Frequencies you feel more than hear.
- Low mids (200-600 Hz): Body and warmth of most instruments.
- Presence (2000-5000 Hz): Clarity and definition, vocal presence.
- Air (8000-20000 Hz): Brilliance and shimmer.
Analysis Settings
Controls how Sound Reaktor interprets your audio. Sound Reaktor 2.0+ features six analysis methods: FFT, Onset, RMS, Centroid, Flatness or Rolloff Frequency.
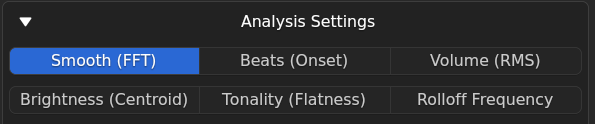
Choosing Your Analysis Method
FFT (Fast Fourier Transform) analyzes continuous energy in your selected frequency range. It measures "how loud is this frequency band right now?" at every frame, producing smooth, flowing animations that follow audio energy.
Onset Detection looks for sudden changes in the audio: the attack of a drum hit, the pluck of a string, the start of a vocal phrase. It identifies discrete moments where something "happens" creating snappy, rhythmic animation that reacts precisely when beats occur.
RMS Energy (Root Mean Square) measures the overall loudness of the audio at every frame. It's not focused on a specific frequency range, but the total volume of the signal. Think of it as a "master volume meter" for your animation. It's the simplest and most intuitive of all methods: loud = high value, quiet = low value. Great starting point if FFT feels too complex.
Spectral Centroid tracks where the "brightness" of the sound is at any given moment. A low value means the audio is bass-heavy (rumbles, low drones), a high value means it's treble-heavy (cymbals, high-pitched synths). It's particularly effective for animating color, light intensity, or any property where you want the animation to reflect the tonal character of the music rather than just its loudness. Spectral Centroid is slightly more advanced than RMS, FFT or Onset. Results depend heavily on your frequency range settings.
Spectral Flatness distinguishes between tonal sounds (musical notes, sustained synths) and noise-like sounds (cymbals, distortion, white noise). Values close to 0 mean the audio is pitched and harmonic and values close to 1 mean it's noisy and unpitched. Useful for triggering effects that should behave differently during melodic sections versus percussive or noisy ones. For example, a material property that changes character when a distorted guitar kicks in. Flatness is an advanced method and requires some experimentation to get useful results.
Spectral Rolloff tracks how much of the audio's energy is concentrated in the lower frequencies versus spreading into the higher ones. A low value means most energy is in the bass and a high value means energy has spread across the full spectrum. It's a good indicator of the overall harmonic richness of a sound at any moment. Like Flatness, Rolloff is and advanced method. It works best for subtle, slowly-evolving animations that follow the tonal complexity of the audio rather than its rhythm or loudness.
| Use FFT When... | Use Onset When... | Use RMS When... |
|---|---|---|
| You want smooth, breathing animations. | You want sharp, punchy reactions. | You want the simplest possible setup. |
| Following sustained sounds (pads, vocals, bass). | Syncing to percussion and rhythmic hits. | Animating directly to overall loudness without caring about specific frequencies. |
| Creating ambient, flowing motion. | Creating beat-locked effects. | The audio has clear loud/quiet dynamics. |
| Audio has gradual volume changes. | Audio has clear transients and attacks. | You just want something that works intuitively. |
| Use Centroid When... | Use Flatness When... | Use Rolloff When... |
|---|---|---|
| You want animation that reacts to the tonal character of the sound, not just its loudness. | You want to distinguish musical, pitched moments from noisy or percussive ones. | You want subtle, slow-evolving animation that follows the harmonic complexity of the audio. |
| Tracking the shift between bass-heavy and treble-heavy moments. | Triggering effects that should behave differently during melodic sections versus chaotic or distorted ones. | The audio has gradual shifts in harmonic richness rather than sharp transients. |
| The audio has interesting harmonic movement over time. | The audio alternates clearly between tonal and noise-like content. | You've already tried other methods and want a more nuanced, musical result. |
FFT Parameters
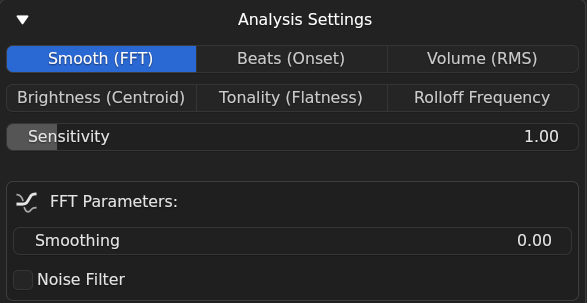
Sensitivity
Controls how the animation responds to different volume levels. It applies dynamic compression to amplitude values:
- Below 1.0: Only the loudest moments produce significant animation.
- At 1.0: Linear response (default).
- Above 1.0: Quieter sounds become more visible while loud peaks are tamed.
Smoothing
Reduces rapid fluctuations by averaging each frame's value with previous frames:
- 0.0: No smoothing, follows every fluctuation.
- 0.3-0.5: Moderate smoothing, removes micro-jitter.
- 0.7-1.0: Heavy smoothing, very fluid motion.
Noise Filter
Eliminates tiny fluctuations below a threshold, preventing jitter during quiet passages:
- 0.02-0.05: Subtle filtering.
- 0.05-0.10: Moderate filtering.
- 0.10-0.20: Aggressive filtering.
Normalization
See the next section.
Onset Parameters
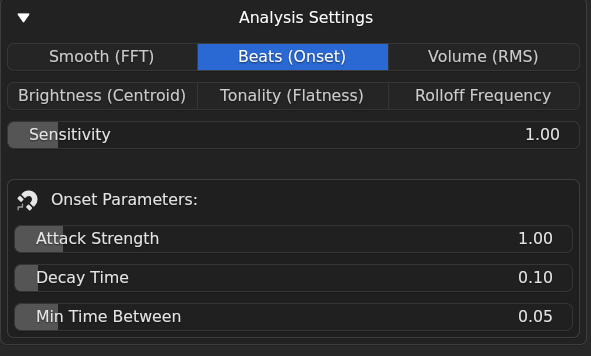
Sensitivity
Controls how easily a beat is detected:
- Below 1.0: Only strongest hits trigger animation.
- At 1.0: Balanced detection (default).
- Above 1.0: More sensitive, picks up quieter hits.
Attack Strength
Determines how much the animation moves when a beat is detected:
- 0.1-0.5: Subtle reactions.
- 1.0: Default, solid visible reaction.
- 2.0-5.0: Strong, punchy reactions.
- 5.0-10.0: Extreme reactions.
Decay Time
Controls how quickly animation returns to rest after a beat (in seconds):
- 0.01-0.05: Very fast decay, snappy staccato motion.
- 0.1-0.2: Quick decay, punchy with visible tail.
- 0.3-0.5: Moderate decay, lingers before returning.
- 0.5-2.0: Slow decay, overlapping flowing motion.
Min Time Between
Minimum interval between detected onsets, preventing duplicate triggers:
- 0.01-0.03: Very short, allows rapid successive hits.
- 0.05: Default, filters most duplicate detections.
- 0.1-0.2: Only distinct, separated hits trigger.
- 0.2-0.5: Very selective, widely spaced beats only.
RMS Parameters (Pro Only)
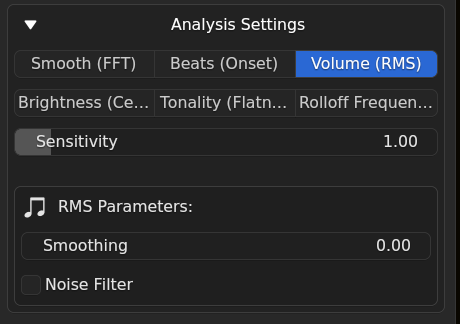
Sensitivity
Controls how the animation responds to different volume levels. It applies dynamic compression to amplitude values:
- Below 1.0: Only the loudest moments produce significant animation.
- At 1.0: Linear response (default).
- Above 1.0: Quieter sounds become more visible while loud peaks are tamed.
Smoothing
Reduces rapid fluctuations by averaging each frame's value with previous frames:
- 0.0: No smoothing, follows every fluctuation.
- 0.3-0.5: Moderate smoothing, removes micro-jitter.
- 0.7-1.0: Heavy smoothing, very fluid motion.
Noise Filter
Eliminates tiny fluctuations below a threshold, preventing jitter during quiet passages:
- 0.02-0.05: Subtle filtering.
- 0.05-0.10: Moderate filtering.
- 0.10-0.20: Aggressive filtering.
Normalization
See the next section.
Centroid Parameters (Pro Only)
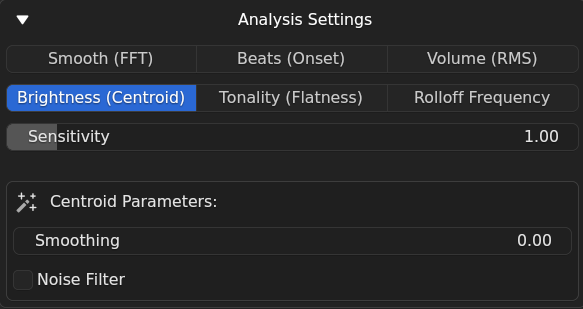
Sensitivity
Controls how strongly the animation reacts to shifts in tonal brightness. Since centroid values tend to change gradually, higher sensitivity can help make subtle shifts more visible:
- Below 1.0: Only significant brightness shifts produce noticeable animation.
- At 1.0: Linear response (default).
- Above 1.0: Small tonal shifts are amplified.
Smoothing
Centroid values naturally evolve slowly. Smoothing reinforces this behavior:
- 0.0: Raw centroid values. May feel erratic on percussive or transient-heavy audio.
- 0.3–0.5: Recommended for most use cases. Removes frame-to-frame noise while preserving tonal movement.
- 0.7–1.0: Very fluid, best for slow ambient transitions.
Noise Filter
Prevents the centroid from jumping erratically during near-silent frames, where the calculated center of mass becomes unreliable:
- 0.02–0.05: Subtle filtering.
- 0.05–0.10: Moderate filtering. Recommended if you notice erratic values during quiet passages.
- 0.10–0.20: Aggressive filtering.
Flatness Parameters (Pro Only)
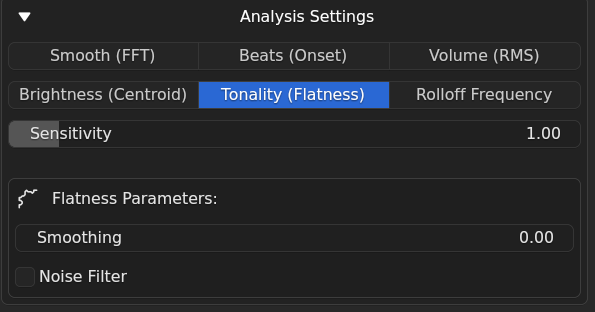
Sensitivity
Controls how strongly the animation reacts to changes between tonal and noisy content. Since flatness values often cluster toward the lower end for musical audio, higher sensitivity can help bring out more variation:
- Below 1.0: Only strongly noisy signals produce significant animation.
- At 1.0: Linear response (default).
- Above 1.0: Subtle shifts between tonal and noise-like content become more pronounced.
Smoothing
Flatness can change abruptly when audio transitions between pitched and noisy content. Smoothing controls how sharply those transitions appear in the animation:
- 0.0: Instant response to tonal/noise transitions. Can feel abrupt.
- 0.3–0.5: Softens transitions while preserving the distinction between tonal and noisy sections.
- 0.7–1.0: Very gradual transitions. May blur the distinction if the audio changes quickly.
Noise Filter
Prevents near-zero flatness values during silent frames from causing unwanted baseline animation:
- 0.02–0.05: Subtle filtering.
- 0.05–0.10: Moderate filtering.
- 0.10–0.20: Aggressive filtering.
Rolloff Parameters (Pro Only)
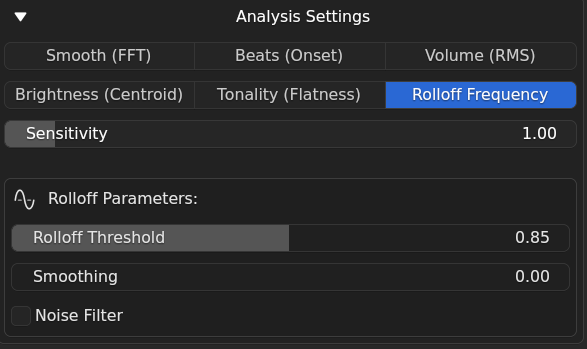
Rolloff Threshold
Sets the percentage of total spectral energy used to calculate the rolloff frequency. This is the primary parameter for tuning the method's behavior:
- 0.75–0.80: Tracks where the lower portion of the energy is concentrated. More sensitive to bass content and reacts earlier.
- 0.85: Balanced default. Captures the point where most of the energy has accumulated.
- 0.90–0.95: Only crosses the threshold when energy has spread into higher frequencies. Reacts to broader harmonic richness.
Sensitivity
Controls how strongly the animation reacts to changes in harmonic spread. Rolloff values tend to evolve slowly, so higher sensitivity can help surface gradual shifts:
- Below 1.0: Only large spectral shifts produce significant animation.
- At 1.0: Linear response (default).
- Above 1.0: Subtle changes in harmonic richness are amplified.
Smoothing
Rolloff values naturally evolve slowly. Additional smoothing reinforces this but can reduce responsiveness to faster harmonic changes:
- 0.0: Raw rolloff values. May feel noisy on complex, rapidly changing audio.
- 0.3–0.5: Recommended starting point.
- 0.7–1.0: Very fluid, best for slow-evolving ambient content.
Noise Filter
Prevents erratic rolloff values during near-silent frames where the energy distribution becomes unreliable:
- 0.02–0.05: Subtle filtering.
- 0.05–0.10: Moderate filtering. Recommended if you notice jumpy values during quiet passages.
- 0.10–0.20: Aggressive filtering.
Normalization (Pro Only)
Sound Reaktor produces amplitude values in the range 0.0–1.0. Normalization controls how raw audio energy is mapped to that range. Two modes are available when using FFT, RMS, or Spectral Bins analysis.
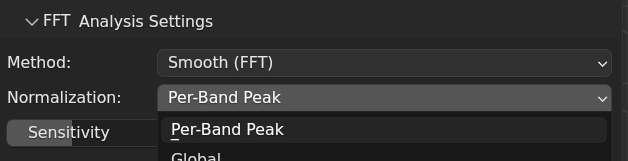
Per-Band Peak (default)
The loudest moment in the analysis is set to 1.0. Every other frame is scaled relative to that peak.
A track where the kick barely reaches half the energy of the chorus will have its kick mapped to ~0.5 .The full 0–1 range is used only if the target frequency band actually gets loud at some point.
Good for:
- Single-property animation (Location, Rotation, Scale, Custom Property).
- Getting the maximum animation range out of quiet or narrow frequency bands.
- Situations where you want the object to hit its full Range value at least once during the track.
Watch out for:
When using Spectral Bins, each band is normalized independently. A quiet high-frequency band will still reach 1.0 . It will animate with the same range as a loud low-frequency band even if the actual energy difference between them is large. This flattens the natural loudness relationships between bands.
Global
All frequency bands share a single reference scale, the 99th percentile of the full spectrogram. Bands that are naturally louder reach values closer to 1.0, bands that are naturally quieter stay lower.
This means the relative energy differences between bands are preserved. If the bass is three times louder than the highs in the audio, the bass output will be roughly three times higher in the animation data as well.
The 99th percentile is used instead of the absolute peak to avoid a single transient spike dominating the scale and compressing everything else.
Good for:
- Spectral Bins: preserves the natural loudness hierarchy across the 9 frequency bands. The animation "feels" like the audio bass moves more than highs when the bass is louder.
- Scenes where the relative difference between multiple simultaneous analyses is meaningful.
- Tracks with a consistent loudness profile throughout.
Watch out for:
- Quiet or sparse frequency bands may produce very little animation movement. They stay low because they are genuinely quiet relative to the rest of the track. Increase Sensitivity or Range to compensate.
- Tracks with a very loud intro followed by a quiet body (or vice versa) may produce unexpected scaling, since the global reference is computed across the full track.
Choosing Between the Two
| Per-Band Peak | Global | |
| Each band fills 0–1 range | Yes | Only the loudest band |
| Relative energy between bands preserved | No | Yes |
| Best for single-property animation | Yes | No |
| Best for Spectral Bins | No | Yes |
| Quiet bands still animate visibly | Yes | Not without Sensitivity boost |
Animate Property
Determines which property of your object responds to the audio: Location, Rotation, Scale, Custom Property or Spectral Bins.
Location
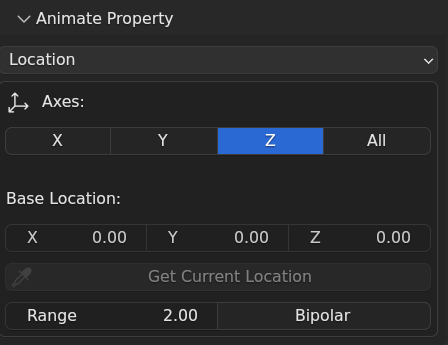
Moves your object through 3D space in response to audio.
- Axes: Select which axes respond (X, Y, Z, or All).
- Base Location: Starting position when audio amplitude is zero.
- Get Current: Button to capture object's current position.
- Range: Maximum distance object moves from base position (in Blender units).
- Bipolar: (new on Sound Reaktor 2.2) When active allows movement to oscillate between a negative and a positive value, instead of moving in a single direction (behaviour if deactivated).
Rotation
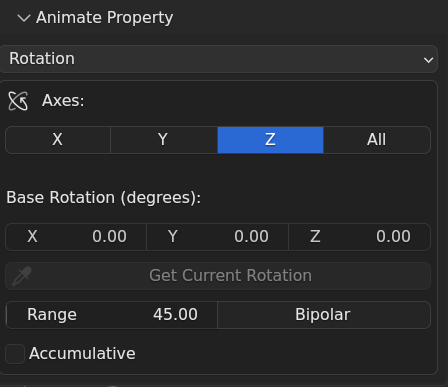
Spins your object based on audio amplitude.
- Axes: Select which axes rotate (X, Y, Z, or All).
- Base Rotation: Starting rotation in degrees when amplitude is zero.
- Get Current: Button to capture object's current rotation.
- Range: Maximum rotation angle in degrees.
- Accumulative: When enabled, object keeps spinning in one direction instead of oscillating. Not available on Driver Mode.
- Bipolar: (new on Sound Reaktor 2.2) When active allows rotation to oscillate between a negative and a positive value, instead of rotating in a single direction (behaviour if deactivated). Doesn't have any effect if Accumulative is ON.
Scale
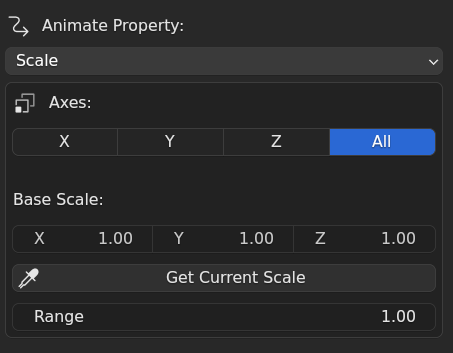
Makes your object grow and shrink with audio. The classic "pulsing" effect.
- Axes: Select which axes scale (X, Y, Z, or All for uniform scaling).
- Base Scale: Object's size when audio amplitude is zero.
- Get Current: Button to capture object's current scale.
- Range: How much the object grows at maximum amplitude (adds to base scale).
Custom Property (Pro Only)
Custom mode is the most powerful and versatile animation target in Sound Reaktor because it breaks the boundary between audio-reactive animation and the rest of Blender.
While Location, Rotation, and Scale are limited to object transforms, Custom mode lets you drive any numeric property in the entire application: shader node values, geometry node parameters, light energy, camera focal length, modifier inputs, constraint influences, shape key weights, compositor node values, and more.
This means Sound Reaktor is not just an object animation tool: it is a universal audio-to-parameter bridge for anything Blender can express as a number. A single analysis pass can make a material's emission strength pulse to the kick drum, a displacement modifier react to the bass, or a depth-of-field blur open and close with the vocal track, properties that have no equivalent in transform-based animation modes.
Custom mode also becomes the entry point for routing any of Sound Reaktor's six analysis methods into a Geometry Nodes or Shader graph, making it the foundation on which the most sophisticated audio-reactive setups are built.
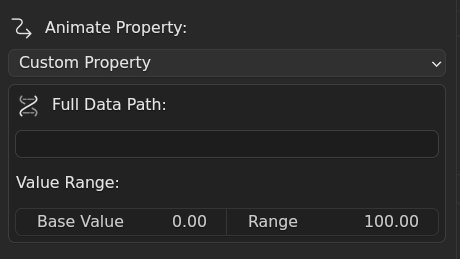
Animate any numeric property in Blender: material values, light intensity, modifier parameters, camera settings, Geometry Nodes, Compositor Nodes and much more.
Getting the Data Path
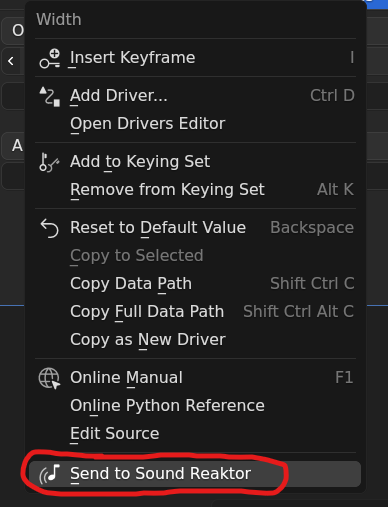
Although the method below of manually copying and pasting the datapath is valid, starting from version 2.2.0 there is a faster and more direct way to do it. Simply choose the ‘Send to Sound Reaktor’ option in the context menu of the property you want to animate, and the addon will handle the entire process automatically.
Find the property you want to animate in Blender's interface.Right-click on the property value.Select Copy Full Data Path.Paste it into the Full Data Path field in Sound Reaktor.
The add-on validates your path immediately. A checkmark means the path works.
Supported Property Types
Works: Light energy, shader node values (emission, roughness), modifier parameters, Geometry Nodes, camera settings, constraint influences, shape key values, Compositor Nodes.
Does not work: Integer properties(*), boolean properties (checkboxes), enum properties (dropdowns), string properties (text fields).
Value Range Controls
- Base Value: Property's value when audio amplitude is zero (auto-filled when you paste a valid path).
- Range: How much the value changes at maximum amplitude.
Base value is the lowest point in the animation and Base Value + Range is the highest point.
Although Sound Reaktor does not directly support integer parameters, there are cases where they can still be used with the help of Geometry Nodes. In the following video, a method is shown for animating the subdivision level, which is an integer parameter, of an object using Sound Reaktor.
Spectral Bins (Pro Only)
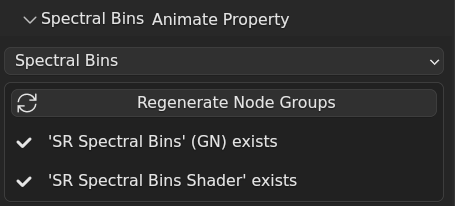
Spectral Bins splits the audio frequency spectrum into 9 independent bands and animates all of them simultaneously in a single analysis pass. Instead of generating keyframes, it works exclusively in Driver Mode . The analysis data is stored in RAM (and optionally cached to disk as a .npz file alongside your .blend).
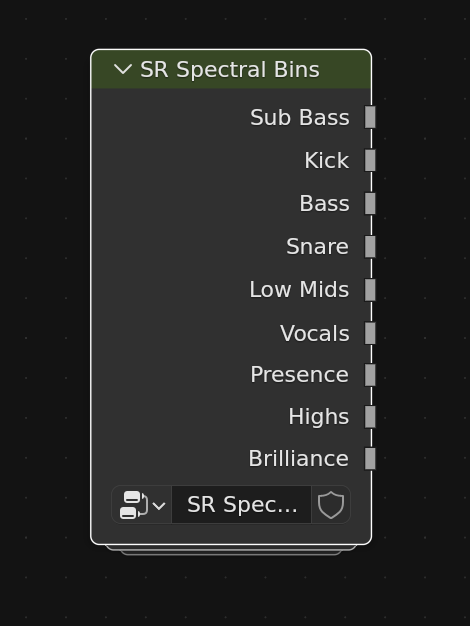
On first use, Sound Reaktor automatically generates two node groups: SR Spectral Bins (Geometry Nodes) and SR Spectral Bins Shader (Shader nodes). Each group exposes 9 float outputs, one per frequency band, ranging from 0.0 to 1.0. You can plug these outputs into any property in a GN modifier or material, displacement amount, scale, emission strength, roughness, or anything else that accepts a float. The node groups are shared across all objects in the scene, so adding the same group to multiple objects costs nothing extra, they all read from the same in-memory data store.
Normalization follows the same dropdown as FFT mode: Per-Band Peak (default) normalizes each band independently to its own peak amplitude. Global uses a single 99th-percentile divisor across the full spectrogram, preserving relative energy differences between bands so that a quiet high-frequency band stays quieter than a loud bass band.
Limitations: Spectral Bins requires the .blend file to be saved if disk cache is enabled. Unsaved files keep the data in RAM only, which is lost when Blender closes. The node groups are generated once and reused; if you delete them manually, use the Regenerate Node Groups button to rebuild them.
Warning: Spectral Bins cannot be baked to keyframes directly from the node group outputs.
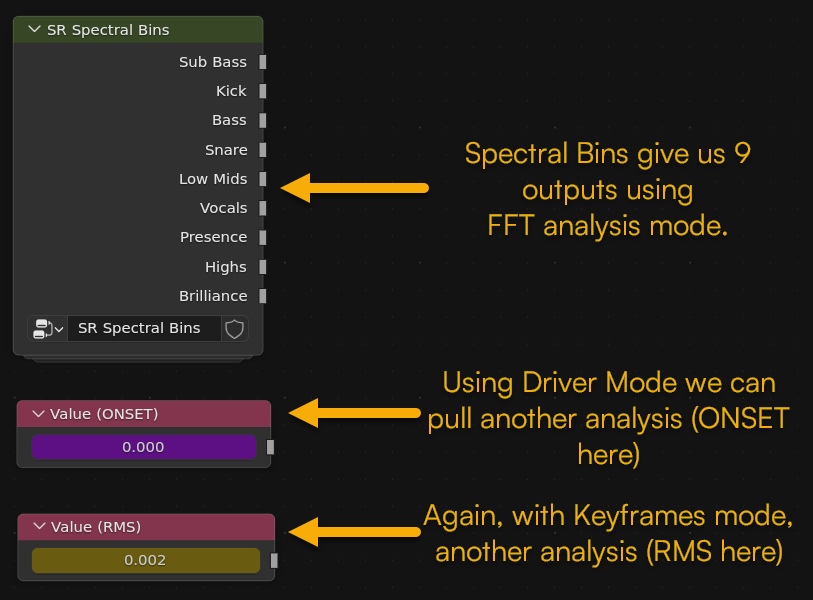
One of the most powerful features of Sound Reaktor 2.4.2 is that, in practice, it allows for up to 11 different outputs within a Geometry Nodes graph or a Shader. Spectral Bins generates a node group with 9 outputs in FFT mode, corresponding to the 9 presets available across the different analysis methods. In addition to that, it is possible to expose two other types of analysis, one in keyframe mode and another in driver mode, by using, for example, a Value node to store them.
SR Animation Info Panel
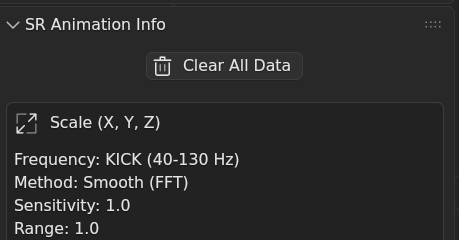
This collapsible panel appears below the main panel when you select an object that has been animated with Sound Reaktor. It provides a summary of all animations applied to that object, including:
- Property type and animated axes.
- Frequency range used.
- Analysis method (FFT or Onset).
- Sensitivity and range values.
- Source audio file.
- Title (audio metadata).
- Artist (audio metadata).
- Technical info (length, bitrate, frequency)
Sound Reaktor 2.0 stores a complete snapshot of every bake parameter alongside each animated property, far more than what the Animation Info panel displays. Fields such as smoothing factor, noise filter settings, high-pass and low-pass filter configuration, onset envelope parameters (attack, decay, minimum time), rolloff threshold percentage, per-axis base values, frame start, frames-per-second, bake timestamp, and both absolute and relative audio file paths are all recorded silently in the background. This extended metadata is the foundation for Re-Reaktor All, an upcoming feature that will allow Sound Reaktor to re-bake every animated property in a scene in one click, restoring the exact same settings used in the original bake, without the user having to reconfigure anything.
Legacy Install (version 1.x)
This part of the documentation corresponds to the installation of versions prior to Sound Reaktor 2.0 and is retained only for convenience in case someone wants to install a legacy version.
Important: If you're about to install Sound Reaktor 1.x, keep reading. At this point, the add-on is installed but not yet functional. You'll see a message indicating that dependencies are required. Sound Reaktor needs three Python libraries (NumPy, SciPy and PyAV) to perform audio analysis. Since version 1.9.2, Sound Reaktor uses the NumPy library included with Blender by default, making SciPy the only required installation. PyAV is optional but recommended, as it allows the use of audio files in MP3, OGG, OPUS, FLAC, M4A, and AAC formats.
Important update: On the order page after purchasing the add-on you will see, in addition to the standard add-on file named sound_reaktor_1_x_x.zip (~40 KB), another version called sound_reaktor_wdeps_winx64_1_x_x.zip (~70 MB). This latter version includes the dependencies but is compatible with Windows only. Do not attempt to install this version on Linux or macOS, as it will not work. If any issues arise, the recommended approach is to revert to the official version and install the dependencies directly from within the add-on.
Installing Dependencies (deprecated on v2.0)
Sound Reaktor relies on NumPy and SciPy for its audio analysis capabilities. NumPy handles the numerical computations, while SciPy provides the signal processing algorithms (FFT and onset detection) that make frequency analysis possible.
To be able to open MP3, OGG, OPUS, FLAC, M4A, and AAC audio files, it uses the PyAV library, which can be optionally installed if that functionality is needed.
Windows
Windows users benefit from automatic installation directly within Blender:
- Open Edit › Preferences › Add-ons.
- Find Sound Reaktor in the list and expand its preferences panel.
- If you used the installer with the bundled dependencies, you will see that the add-on is ready to use. If you installed the add-on without dependencies, you can now choose which ones to install. The only mandatory dependency since version 1.9.2 is SciPy, since Sound Reaktor now uses the NumPy library that comes bundled with Blender by default.
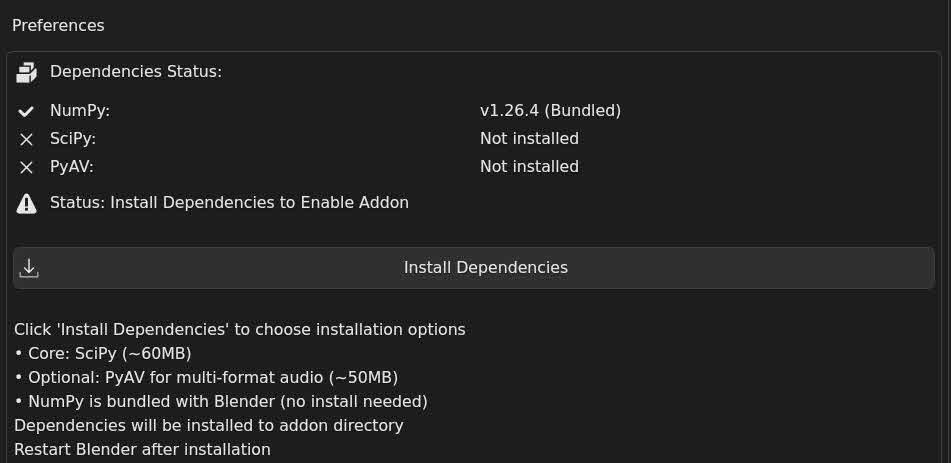
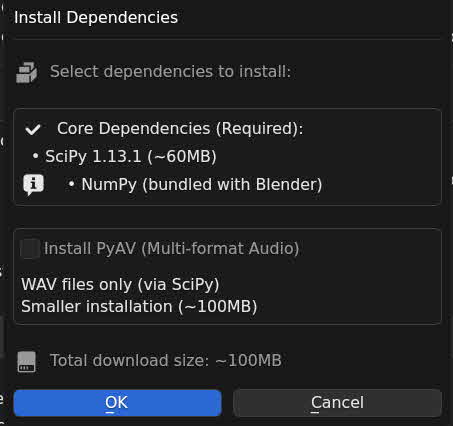
- Click the Install Dependencies button and you will see a dialog where you can choose which dependencies you want to install. By default, both SciPy and PyAV will be installed, so Sound Reaktor will have all its features enabled. However, you can choose not to install PyAV, and the add-on will work exactly the same, but you will only be able to load audio files in WAV format.
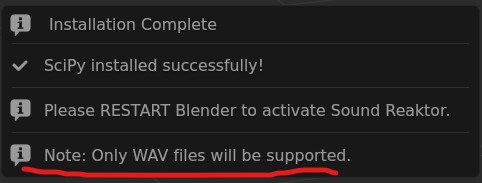
- When installation completes, a dialog will prompt you to restart Blender.
- If you chose not to install PyAV, you will see that the add-on is functional but limited to WAV. At any time, you can choose to install PyAV if you need support for the rest of the audio formats.
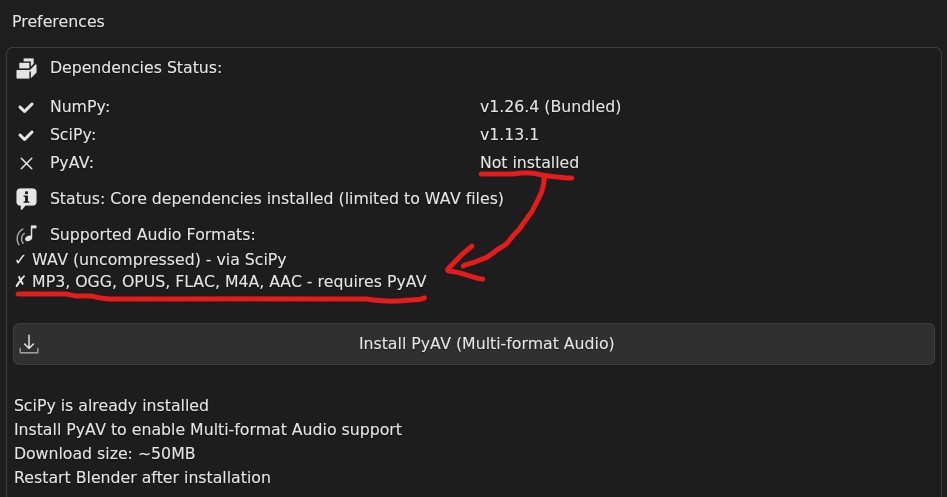
- To do this, simply click the Install PyAV (Multi-format Audio) button, and after a few moments, the add-on will prompt you to restart Blender to complete the library installation.
- After restarting, if you go back to the Sound Reaktor preferences, you will see that all dependencies are installed and you can use all the add-on's features. This is also what you will see if you install the version of the add-on that includes the dependencies.
Troubleshooting: If installation fails, check that your internet connection is active and that no firewall or antivirus software is blocking the download. Running Blender as administrator may help. The Blender console (Window › Toggle System Console) will display detailed error messages.
Linux
Linux installation requires manual steps through the terminal. The process depends on how Blender was installed on your system.
Blender Downloaded from blender.org
If you downloaded Blender directly from the official website, it includes its own bundled Python interpreter:
Blender Installed via Package Manager
If Blender was installed through your distribution's package manager (apt, dnf, pacman), it typically uses the system Python. Installing NumPy and SciPy to a user-specific location is recommended:
- Ensure pip is installed. On Debian/Ubuntu-based distributions:
sudo apt install python3-pip - Create a temporary directory for downloading the packages:
mkdir ~/tmpblender - Install NumPy and SciPy to the temporary directory:
python3.13 -m pip install scipy pyav --target ~/tmpblender - Create the Blender scripts modules directory (replace 4.5 with your Blender version):
mkdir -p ~/.config/blender/4.5/scripts/modules - Copy the libraries to the Blender modules directory:
cp -r ~/tmpblender/* ~/.config/blender/4.5/scripts/modules/ - Optionally, remove the temporary directory:
rm -rf ~/tmpblender - Restart Blender and verify the installation in add-on preferences.
macOS
macOS installation follows the same process as Linux when Blender is downloaded from blender.org. The Python executable is located at:
/Applications/Blender.app/Contents/Resources/4.x/python/bin/python3.11./python3.11 -m pip install scipy pyavRestart Blender after installation completes.
Roadmap
Sound Reaktor is actively developed with new features planned for future releases.
Near Term
- Additional Audio Formats: MP3, OGG, OPUS, FLAC, M4A, AAC support.(Included with v1.9.2)
- More presets: Tailored to specific music genres and sound effects. (Included with v2.0.0)
- Batch Object Processing: Animate multiple objects at once with same settings.
- Pre-packaged Dependencies: Bundled wheels for offline installation. (Included with v1.8.3)
- Low/High Pass Pre-Filters: Remove low/high frequency content before analysis. (Included with v2.0.0)
Medium Term
- New Analysis Methods: RMS Energy, Spectral Centroid, Spectral Flatness, Spectral Rolloff. (Included with v2.0.0)
- Re-Reaktor All System: Re-apply animations across multiple objects. (Partially included with v2.4.2)
- Audio Visualizer Generator: Automatic creation of visualizer geometry.
- Visual Audio Preview: Waveform and spectrogram display in UI.
- Chroma Features: Detect musical pitch classes.
- Driver-Based System: Non-destructive animation using Blender's driver system. (Included with v2.4.2)
- Multiple Audio Source Mixing: React to different tracks from multitrack session.
- MIDI Support: Trigger animations from MIDI note data.
Have an idea? Feature requests are welcome through SuperHive Market's messaging system or via support email.
Changelog
Version 2.4.2
- Add: Shader node group for Spectral Bins ("SR Spectral Bins Shader") . Use frequency data directly in materials. Both node groups are auto-generated on first use.
- Add: Drivers mode UX improvements. Main button shows "ANALYZE & DRIVE" with a dedicated icon, dynamic tooltip describes the active mode, SR driver count is shown in the panel, node groups regenerate in-place preserving existing references in the node editor.
- Fix: 50–200× faster keyframe baking! Scale, Location, Rotation and Custom Property now inject keyframes in bulk instead of one by one.
- Fix: Custom data path refactoring to use as a function with keyframe and driver mode.
- Fix: Custom driver not animating shape keys.
- Fix: Custom path parser: modifier names with brackets, shape key driver target, shared parser between keyframe bake and driver apply.
- Fix: Sound Reaktor driver detection and removal missing shader node tree, material, and shape key animation datablocks.
- Fix: Extend Sound Reaktor driver detection to object data, data node tree, lights and cameras animation datablocks.
- Fix: spectral centroid now respects the user-selected frequency band (previously computed over the full spectrum, ignoring Frequency Range).
- Fix: Driver frame offset no longer collapses frame_start=0 to 1 due to Python falsy semantics.
- Fix: Analyze_fft_bins replaces its O(bins × frames × columns) nested loop with a precomputed frame→STFT-column mapping for a significant speedup on long tracks.
- Fix: Timeline frame bounds now use proper numeric limits instead of hardcoded values, preventing edge cases with very long audio files.
- Fix: Spectral Bins tooltip now correctly mentions both Geometry Nodes and Shader node groups.
- Fix: Old cache files on disk are now purged before writing a new one, preventing stale .npz files from accumulating.
- Fix: Accumulative rotation toggle is now grayed out in Drivers mode. Accumulative rotation is not supported with real-time drivers.
- Fix: Custom property driver mode now works for all target types.
- Fix: Custom path parser now correctly handles modifier names containing brackets.
- Fix: Shape key drivers now target the Key datablock instead of the individual KeyBlock.
- Fix: Sound Reaktor driver detection and removal now searches all relevant datablocks.
- FFT and Spectral Bins drivers can now coexist on different objects using the same audio file.
Version 2.4.1
- Fix: Stereo-to-mono conversion in the WAV loader now correctly averages channels before casting, preventing integer overflow with 16-bit files.
- Fix: Butterworth pre-filter no longer crashes when the cutoff frequency is at or above the Nyquist limit.
- Fix: Warning shown in Frequency Range panel when the minimum frequency is set higher than the maximum.
- Fix: Driver engine NPZ file handle is now properly closed after reading, preventing file lock issues on Windows.
Version 2.4.0
- Add: Animate Property resets to Scale automatically when switching from Drivers to Keyframes mode, preventing invalid state.
- Add: Audio File label and file picker merged into a single compact row.
- Add: Normalization dropdown in Analysis Settings (FFT, RMS and Spectral Bins) with two modes: Per-Band Peak (default, legacy behavior) and Global (99th-percentile of the full spectrogram).
- Fix: Analysis Settings and Animate Property panels are now collapsed by default for a cleaner initial UI.
- Fix: Driver Mode UI refactored. Radio buttons for mode selection, inline cache info, SR Data sub-panel removed.
- Fix: FFT normalization no longer destroys inter-band amplitude differences.
- Fix: RMS normalization suffered from the same destructive min-max pattern and is now corrected, with the new dropdown available in RMS mode as well.
- Fix: Spectral Bins normalization pipeline corrected.
- Fix: STFT overlap is now matched to the project FPS, eliminating jitter artifacts at high frame rates (60fps+).
Version 2.3.0
- Add: Driver Mode. Analyze audio to RAM and apply real-time drivers to object properties. Drivers can be removed or converted to keyframes at any time.
- Add: Disk cache for Driver Mode. Save analysis data to .npz file alongside the .blend for persistent playback across sessions.
- Add: Spectral Bins. Animate 9 frequency bands simultaneously using a single analysis pass. Generates a Geometry Nodes group ("SR Spectral Bins") with one output per band.
- Add: Bake to Keyframes. Converts all Sound Reaktor drivers on the active object to standard keyframes and removes the drivers.
- Add: Remove Drivers. Removes all SR drivers from the active object without baking.
Version 2.2.1 (Updated: 2026/03/26)
- Add: Send to Sound Reaktor context menu entry for Custom mode.
- Add: Bipolar toggle for Location and Rotation modes to enable symmetric oscillation around base position.
- Add: Refactor UI into native sub-panels, remove manual expand toggles, add poll check to preview operator.
- Fix: Disable Bipolar toggle when Accumulative is active.
- Fix: Stale keyframes on axis change. Clear all axes before re-baking Location, Rotation and Scale.
- Fix: Reset object to base values before baking to ensure correct starting position for Location, Rotation and Scale.
- Fix: minor bugfixes and tooltips rewrites.
- Fix: F-string backslash incompatibility with Python 3.11 (Blender 4.x/5.0).
Version 2.0.1
- Fixed: RMS Parameters not showing in UI (smoothing + noise filter)
Version 2.0.0
- New analysis method: RMS Energy. Measures overall volume/loudness of the signal. Simple and fast. Ideal for broad amplitude-driven animation.
- New analysis method: Spectral Centroid. Measures the "brightness" of the audio where the center of mass of the spectrum falls.
- New analysis method: Spectral Flatness. Measures tonality vs. noisiness (Wiener entropy).
- New analysis method: Spectral Rolloff. Frequency below which a configurable percentage of total spectral energy falls.
- Audio Pre-Filtering. High-pass filter & Low-pass filter.
- Added collapsible sections for Frequency Range, Analysis Settings, and Animate Property panels.
- Added Analysis Preview panel with min/max/average/P95 statistics and semantic labels.
- Added new frequency presets: Sub Bass, Low Mids, Presence and Brilliance with frequency ranges shown in labels.
- Now timeline playback automatically stops when "MAKE IT DANCE!" is triggered.
- Addon converted to Blender Extension format (compatible with Blender 4.2+ and 5.x)
- SciPy and PyAV wheels bundled for Windows, supporting Python 3.11 (Blender 4.x) and 3.13 (Blender 5.1)
- Removed `dependency_installer` module. Dependencies are now always bundled (Blender extension behaviour).
- Since PyAV is always present, WAV files now always use scipy (direct PCM read), all other formats use PyAV.
- Fixed WAV/FLAC audio desync caused by incorrect mono conversion. Now normalizes to float32 before mixing channels.
- Updated SciPy to 1.17.0 and PyAV to 13.0.0 for Blender 5.1 compatibility.
- Complete redesign of the `SR_animation_data` custom property schema. Now stores all bake parameters per property: frequency range, method, sensitivity, smoothing, range, audio file, data path.
- Fixed progressive slowdown on re-bake: existing keyframes are now cleared before each bake instead of accumulating.
- Orphan keyframe cleanup (keyframes outside timeline range) now scoped exclusively to SR-owned F-curves. User animations on the same object are no longer affected.
- Now orphaned sound datablocks are cleaned up after strip removal.
- Fixed O(N²) keyframe deletion loop.
- Bugfix: FFT div-by-zero: Added guard for when all amplitudes are identical (DC signal or silence) onsistent with analyze_rms() behavior.
- Bugfix: File handle leak: av.open() in extract_metadata() now uses "with" statement, preventing handle leaks on exception.
- Bugfix: "modifier_name" scope bug. Variable was referenced outside its defining conditional block in bake_custom()
- Bugfix: Spectral Flatness inversion bug. Adding "eps" to all magnitude bins uniformly destroyed distribution information, causing tonal signals to appear noisy and vice versa.
- Bugfix: "samples_per_frame" zero guard. Added "max(1, ...)" guard in all 6 analysis functions to prevent division by zero at extreme FPS values.
- Bugfix: Fixed preferences panel not showing in Blender Extensions.
- Removed "Clear All Data" button. Dangerous with the v2 metadata system.
Version 1.9.3
- Fixed: WAV and FLAC audio files now synchronize correctly when PyAV is installed.
Version 1.9.2
- Fixed array indexing in custom properties. Resolved crash when animating custom properties with array indexing.
- Fixed complex path parsing. Correctly handles node inputs and nested properties with multiple bracket notations.
- Fixed PyAV container memory leak. Audio container now properly closes on errors, preventing memory leaks with corrupted/invalid audio files.
- Fixed orphan keyframe cleanup. Properly removes old keyframes in Blender 4.x/5.x.
- Updated minimum Blender version to 4.2.
- Refactored metadata storage code.
Version 1.9.1
- Added OPUS format support.
- Optional PyAV installation UI.
- Fixed FLAC decoding bug. Corrected double duration keyframes issue.
- Minor UI fixes. Improved user interface stability and appearance.
Version 1.9.0
- Multi-format audio support - MP3, OGG, FLAC, M4A, AAC via PyAV library.
- Audio metadata extraction. Display title, artist, album, duration, bitrate, sample rate.
- Dynamic format detection. Automatic fallback to scipy for WAV files.
- PyAV 12.3.0 new optional dependency for multi-format support.
- Optimized NumPy handling. Uses Blender's bundled NumPy (no external install needed).
Version 1.8.3
- Added visual feedback with progress cursor during analysis.
- Minor bug fixes.
Version 1.8.2
- Updated SciPy to version 1.13.1.
- Resolved dependency installer conflict.
- Set minimum supported Blender version to 4.0.
- Fixed hard and soft limits for location, scale, and custom value ranges.
- General code cleanup and visual adjustments.
Version 1.8.1
- Fixed scale accumulation bug across consecutive runs.
- Added Base Scale fields.
- Added "Get Current" buttons for Base Location, Rotation, and Scale.
- Replaced "Clear Orphan Data" with "Clear All Data" in Info Panel.
- UI cleanup to reduce vertical space usage.
Version 1.8
- Added SR Animation Info panel to track animated properties.
- Added "Clean Data" button to info panel.
- Fixed bugs parsing complex data paths for modifiers.
Version 1.7.1
- Fixed truncated error messages for incorrect custom data paths.
- Rewrote parsing logic for long-form modifier properties.
- Disallowed integer types in Custom Property mode (floats only).
- Added support for vector3 components in data paths.
- Fixed array_index initialization after data path parsing.
- Fixed orphaned keyframes when changing audio files.
Version 1.7
- Reworked Sensitivity parameter for FFT mode to use dynamic compression.
Version 1.6
- Added checkbox to replace existing sound in sequencer.
- Added restart reminder modal after installing dependencies.
- Removed Reinstall and Uninstall dependency buttons from preferences.
- Fixed add-on activation without dependencies installed.
- Fixed cache parameter bug with clamp_values.
- Added GNU license headers for SuperHive Market compatibility.
Version 1.5
- Added dual analysis system: FFT and Onset Detection.
- Dynamic UI adapting to selected analysis method.
- New onset parameters: Attack Strength, Decay Time, Min Time Between.
- Created separate analysis.py module.
Version 1.3.1
- Added operating system detection.
- Windows: automatic dependency installation.
- Linux/macOS: manual installation instructions with detected paths.
- Platform-specific UI in preferences panel.
Version 1.3
- Added intelligent caching system for audio analysis.
- Cache invalidation when parameters change.
- Added cache status indicators.
Version 1.2
- Removed instructional text boxes from Custom Property mode.
- UI cleanup for better and compact appearance.
Version 1.1.1
- Removed update_max_size callback that modified delta_scale in real-time.
- Fixed unexpected object size changes when adjusting Max Scale.
Version 1.1
- Implemented smart amplitude clamping based on property type and range.
- Fixed high Sensitivity values not producing expected amplitude.
Version 1.0 (First Private Beta)
- Added Noise Filter to reduce animation jitter.
- Configurable threshold for filtering small fluctuations.
Version 0.9
- Rewrote axis selection logic with state memory.
- Fixed axis selection bugs when toggling between individual axes and "All".
Version 0.8
- Added Blender 5.0 compatibility.
- Updated sequencer API from sequences to strips collection.
- Backward compatible with Blender 4.x.
Version 0.7
- Replaced simple data path with full Blender data path system.
- Support for materials, modifiers, constraints, world properties.
- Real-time path validation with status indicators.
- Support for array properties with index notation.
Version 0.6
- Refined frequency presets from 6 to 5 optimized ranges.
- Added detailed tooltips with descriptions.
Version 0.5
- Added duplicate audio detection in Video Sequencer.
- Strips named with "SR_" prefix for identification.
Version 0.4
- Reorganized Animate Property order.
- Added comprehensive Location animation support.
- Added comprehensive Rotation animation with Accumulative mode.
- Enhanced Scale animation.
- Unified axis selection behavior.
Version 0.3
- Added intelligent data path detection for light and camera properties.
- Automatic "data." prefix addition when needed.
Version 0.2
- Added Sensitivity control with dynamic compression.
- Added Smoothing control with Exponential Moving Average.
Version 0.1 (Initial Alpha Release)
- FFT-based audio analysis using NumPy/SciPy.
- WAV file support.
- Scale animation support.
- Basic Custom Property animation.
- Frequency preset system.
- Custom frequency range mode.
- Video Sequencer integration.
- Dependency installation system.
- Blender 4.0+ support.
Credits
Sound Reaktor was developed by Yatima.
Third-Party Libraries
Sound Reaktor depends on the following open-source libraries:
NumPy
NumPy is the fundamental package for scientific computing in Python, providing support for large, multi-dimensional arrays and matrices, along with a collection of mathematical functions to operate on these arrays.
- Website: numpy.org
- License: BSD 3-Clause License.
SciPy
SciPy is a library for scientific and technical computing, built on NumPy. Sound Reaktor uses SciPy's signal processing module for FFT analysis and onset detection algorithms.
- Website: scipy.org
- License: BSD 3-Clause License.
PyAV
PyAV provides Pythonic bindings for FFmpeg libraries, offering direct, high-level access to video and audio streams.
- Website: pyav.org
- License: BSD 3-Clause License.
The BSD 3-Clause License permits redistribution and use in source and binary forms, with or without modification, provided that copyright notices and license terms are retained.
Contact and Support
If you encounter issues, have questions, or want to suggest features, there are two ways to reach support:
blenderartists.org Thread
To discuss Sound Reaktor, follow updates, or get general support, there is also a thread on blenderartists.org forum.
For technical support, bug reports, or feature requests:
support@yatima.xyz
When Reporting Bugs
Please include the following information to help diagnose issues quickly:
- Your Blender version.
- Your operating system.
- A description of what you were trying to do.
- What happened instead of the expected result.
- Any error messages from the System Console.
Tip: Detailed information helps provide effective solutions faster. The more context you provide, the better we can assist you!